
What is telemetry?
Share me
Month: January 2023
Author: January 9, 2023 by Jesus Vigo
Source: https://www.jamf.com/blog/what-is-telemetry-and-how-it-works/
While not among the more exciting topics in the IT and infosec world, there are arguably fewer topics that are as significant to the determination of device health and to a greater extent, ensuring the security of your endpoints, than telemetry.
In this blog series, this unsung hero highlights the various needs, uses and functionality made possible through telemetry data. Future articles in this series will focus more closely on its:
- Collection and storage
- Automated alerting and reporting
- Full automation and correlation
What is telemetry?
Think of each login authenticated, commands executed, processes performed, and so on and so forth. In a nutshell, most changes that occur on a device are recorded in logs detailing:
- The actions performed
- Programs affected
- Diagnostic information
- System services utilized
- Date and time stamps
Among other useful data recorded that provides a window into your Mac endpoint to determine current health and security vital statistics that speak directly to the operational, functional, technical and security status of apps and data contained within your Mac.
Why is telemetry critical?
To exemplify the importance of telemetry data, it might be easier to look at it as we do our own vital statistics. For example, we visit the doctor, and they draw a vial of blood, which is processed, to determine if any health-related issues are present. Factors like certain forms of disease or too little or a build-up of vitamins and minerals signal that something may be off in our bodies and medical action may be necessary to correct it before it leads to something far more troubling.
The same can be said for telemetry data, except it refers to the overall health of your Mac fleet. It is the culmination of data gathered from various sources and subsystems within Mac that paint the picture of how healthy your endpoints are and based on that, inform what remediation workflows should be taken to correct the issue(s) identified to:
- Mitigate risk
- Keep data secured
- Uphold user privacy
- Maintain compliance
“If you cannot measure it, you cannot improve it.” – Lord Kelvin
How does telemetry work?
Armed with the “what” and “why”, we now tackle how telemetry works by providing some scenarios in which collection and analysis of granular telemetry data are imperative to:
- identifying security threats
- resolving security incidents
- complying with regulations
that your organization may be the target of and/or pertaining to the industry your organization belongs to, making it subject to governmental oversight.
Threat defense and investigation
As mentioned prior, device health information provides IT and Security teams with the details necessary to best defend their endpoints, as telemetry data provides granular insight into what parts of the system require remediation. This could be something as simple as an app that is not up-to-date or something more significant, such as a critical macOS security update that patches a vulnerability with a high severity rating.
Without this rich telemetry data available, administrators would not have the visibility into their fleet to remediate such a threat proactively. This leaves affected devices unprotected and at risk of exploitation from bad actors, and potentially worse.
Similarly, let’s assume that the unpatched vulnerability example used above happened and the device was unfortunately exploited, leading the device to be compromised. The user may report something weird occurring with their Mac, but administrators will be hard-pressed to understand exactly what’s happening and why it’s happening. These are two critical pieces of information required when triaging an issue to determine the next steps.
This is another watershed moment for telemetry data because, with it, administrators have the answers to those questionsand will be able to trace how the exploit came to pass and the way through to where the system currently stands. With this data in tow, remediation workflows can be executed to purge the threat, remediate the vulnerability and restore functionality to the user’s Mac – mitigating the threat – and saving time in the process, which is a crucial commodity during any attack.
Regulatory compliance
Earlier we touched upon compliance, more specifically governmental oversight of highly regulated industries. Examples of these would be healthcare, fintech and education. Depending on where your company is located, certain local, state, federal and/or regional laws may apply. Furthermore, what countries your organization does business with may also make it subject to regulatory requirements in those regions, like GDPR and its user privacy protections being legally enforceable for any organization collecting personally identifiable information (PII) from European citizens – regardless of if your organization has a physical presence in Europe.
In fact, many government security policies surrounding regulatory oversight mandate telemetry to prove that organizations are actively taking steps to comply with regulations. The general guidance being: If you can’t verify that your data was protected – then it wasn’t.
Make no mistake, telemetry data alone does not equal compliance. But rather, if your organization has implemented the proper controls and policies to ensure the security of compliant data types alongside the requisite checks and balances to maintain compliance, then the rich telemetry data will reflect this when gathered and is used to verify compliance with regulators during audits.
Cybersecurity insurance
With growing security threats and increased risk, it’s no surprise that cybersecurity insurance is a popular option among organizations that are choosing risk deferment as part of their security strategy. That said, recent concerns over tightened policies from insurers “based in part on the frequency, severity, and cost of cyber attacks”, according to CNBC, means that it may become more difficult for organizations to obtain cyber insurance or limitations of coverage may require organizations to face added scrutiny during the underwriting process.
The latter indicates a possible shift that finds insurers requiring verification of risk mitigation strategies in place and actively maintained in order for coverage to be obtained and/or kept. Not dissimilar to insurance companies in other sectors, for example, auto and home insurance which contains provisions requiring owners to act using due diligence to maintain their cars and homes, as failure to do so could render the coverage null and void. Telemetry, in this case, verifies such due diligence on behalf of the organization, providing proof that the necessary security controls and policies are in place in accordance with insurance requirements.
Taking it one step further, say your organization has cyber insurance and unfortunately becomes a victim of a cyberattack. You may be thinking, how can telemetry help you then when the damage is done?
Well, telemetry data is still critical for internal and criminal investigations, as mentioned previously. Also, it plays an essential role when gathering evidence for a cyber insurance claim to determine what happened, how it occurred and potentially, who the bad actors are, especially as growing awareness surrounding insider threats and how devastating those types of attacks can potentially be. Lastly, telemetry data helps digital forensics professionals glean details important to the investigation from seemingly insignificant data artifacts.
Jamf Protect is telemetry (and much more)
Jamf Protect is endpoint security that is purpose-built for Mac. You know that.
But did you know that the deep visibility that it provides into your Mac fleet is supported and informed directly from the telemetry data that it actively collects from each managed endpoint?
That’s right! As Jamf Protect constantly monitors Mac endpoints for threats, this and all activity generates entries in the log data (telemetry). This is sent via the Jamf Protect agent to the cloud-based console, or your preferred Security Information and Event Management (SIEM) solution (more on this in the second blog in this series).
Upon receiving this data, IT and Security professionals can leverage it to proactively monitor for and detect unknown threats on macOS computers in their environments. And with the release of agent version 3.6.0.727, new functionality for Protect Telemetry and Protect Offline Deployment mode are made available.
The former has been discussed throughout this blog and will continue in future installments in this series. While the latter incorporates much of the data stream feature set from Jamf’s previous acquisition, Compliance Reporter is for all Jamf Protect customers!

Jamf Pro how-to: Automated Device Enrollment Integration and Renewal
Share me
Month: January 2023
Automated Device Enrollment Integration
Apple’s Automated Device Enrollment, also known as zero-touch deployment, immediately enrolls and configures a device when a user turns it on. No user interaction from IT. This enrollment method is most commonly used for devices owned by your organization and establishes the following device statuses:
- Supervised—Supervision prevents users from removing the MDM profile installed by Jamf Pro.
- User-Approved MDM—User-Approved MDM grants Jamf Pro administrators additional device management privileges, such as managing third-party kernel extensions.
Integrating Jamf Pro with Automated Device Enrollment involves the following steps:
-
Download a public key (.pem) file from Jamf Pro.
-
Obtain a server token file (.p7m) from Apple.
-
Upload the server token file to Jamf Pro.
You can repeat this step to create multiple multiple Automated Device Enrollment instances in Jamf Pro.
Jamf Pro automatically syncs and displays Automated Device Enrollment updates from Apple every two minutes.
Note:
-
Up to a two minute syncing delay may occur, which can cause outdated Automated Device Enrollment to display in Jamf Pro. Additional environment-specific factors can affect the syncing between Jamf Pro and Apple.
-
Deleting an Automated Device Enrollment instance removes the integration from Jamf Pro but does not delete the settings in Apple School Manager or Apple Business Manager.
Downloading a Public Key
Before you can obtain the server token file from Apple, you need to download a public key from Jamf Pro.
- In Jamf Pro, click Settings
 in the top-right corner of the page.
 - In the Global section, click Automated Device Enrollment
 .
. - Click Public Key to download the public key.
The public key (.pem) is downloaded.
Obtaining the Server Token File
You must upload a public key (.pem) from Jamf Pro to Apple School Manager or Apple Business Manager to obtain a server token file (.p7m).
You need an Apple School Manager or Apple Business Manager account with the Administrator or Device Manager role assigned.
For more information about Apple School Manager, accounts, and roles, see the following Apple documentation:
Note:
Jamf recommends you only use one Apple School Manager or Apple Business Manageraccount to integrate with Automated Device Enrollment. Using more than one account makes any issues more difficult to troubleshoot..
Uploading the Server Token File to Configure Automated Device Enrollment
Upload a server token file to create an Automated Device Enrollment instance in Jamf Pro.
- In Jamf Pro, click Settings in the top-right corner of the page.
- In the Global section, click Automated Device Enrollment .
- Click New
 .
. - Click Save
 .
.
To configure another instance, repeat this process.
You can now configure Computer PreStage Enrollments or Mobile Device PreStage Enrollments to enroll devices into Jamf Pro via Automated Device Enrollment.
Replacing a Server Token File to Renew an Automated Device Enrollment Instance
If your Automated Device Enrollment server token expires or needs replacing, you must download a new token from Apple School Manager or Apple Business Manager and upload it to Jamf Pro.
Jamf Pro displays an expiration warning in Notifications when the Automated Device Enrollment service token is about to expire.
Note:
If you are uploading a new server token file (.p7m) to renew an expired Automated Device Enrollment instance, Jamf recommends that you do not delete the expired instance from Jamf Probefore uploading the new server token file.
- Log in to Apple School Manager or Apple Business Manager.
- If prompted, follow the onscreen instructions to verify your identity.
- Click on your account name in the lower-left corner, and then choose from the pop-up menu.
- Select your server name listed under Your MDM Servers.
- Click Download Token.
- Choose from the pop-up window and save to your computer.
- In Jamf Pro, click Settings in the top-right corner of the page.
- In the Global section, click Automated Device Enrollment .
- Select the Automated Device Enrollment instance you want to renew and click Edit.
- Click Upload Server Token File to upload the server token file (.p7m) you downloaded from Apple. The information contained in the server token file is displayed.
- Click Save .
Jamf Pro how-to: Volume Purchasing Token Integration and Renewal
Share me
Month: January 2023
Volume Purchasing Integration
Jamf Pro’s volume purchasing integration syncs with Apple School Manager or Apple Business Manager to automatically populate your apps and books in Jamf Pro for managed distribution to devices or users.
In Apple School Manager or Apple Business Manager, the Apps and Books section provides a central place to purchase content in volume. All purchased content is associated with a location-based service token. A default location is included, but you can create multiple locations to help you manage your content by office location, departments, or budget holder.
In Jamf Pro, each location token is uploaded to establish volume content syncing and make your apps and books are available for managed distribution. You can also view and search app information, such as the amount of used and available licenses for paid apps.
Volume Purchase Location Considerations
Consider the following when adding locations to volume purchasing in Jamf Pro:
-
To avoid issues with content scoping and renewal dates, it is recommended that you do not configure multiple locations for the same distribution content.
-
Each service token for the specific distributed content should only be allocated once. For example, if the service token you want to upload already exists in Apple’s Profile Manager, delete the service token from Apple’s Profile Manager before uploading it to Jamf Pro. This limitation includes a single server instance.
-
If you upload a new token file to renew distributed content licenses, it is recommended that you do not delete the expired location from Jamf Pro before uploading the new server token file.
-
If you configured a location for your distributed content licenses and later integrated your environment with Apple School Manager or Apple Business Manager, it is recommended that you do not add a separate location for these licenses.
Use the button on the location Details tab to upload the new token (.vpptoken) that you acquired from Apple School Manager or Apple Business Manager. This will allow Location to display for your Apple School Manager token in Jamf Pro. When prompted, reclaim the service token to use it with your Jamf Pro instance. For information on how to obtain the token file, see the following Apple documentation:
Note:
It is recommended that you only use one Apple School Manager or Apple Business Manager account to integrate with volume purchasing. Using more than one account makes it difficult to isolate the account causing the issues when troubleshooting.
-
Deleting a location removes the instance from Jamf Pro but does not delete the settings in Apple School Manager or Apple Business Manager.
Adding a Volume Purchasing Location to Jamf Pro
To distribute paid apps and books purchased in volume, you must upload one or more location-based tokens to Jamf Pro.
You also choose the country associated with the location and can specify that all purchased content is populated in the app and eBook catalogs.
- In Jamf Pro, click Settings in the top-right corner of the page.
- In the Global section, click Volume purchasing
 .
. - Click New .
- Click Save .
Adding Volume Purchasing Notifications
To make the managed distribution content management more efficient, you can enable a volume purchasing notification. This allows Jamf Pro to send you a daily email after the predefined condition is triggered. You can also specify the recipients to send the notification to. To properly configure a notification, at least one location must exist in Jamf Pro, and you must be logged in with a Jamf Pro user account that has full access or site access and an email address configured.
To add volume purchasing notifications, you need:
-
An SMTP server set up in Jamf Pro (For more information, see SMTP Server Integration.)
-
At least one location configured in Jamf Pro
-
Email notifications enabled for Jamf Pro user accounts (For more information, see Email Notifications.)
- In Jamf Pro, click Settings in the top-right corner of the page.
- In the Global section, click Volume purchasing .
- Click New .
- Click the Scope tab and configure the scope of the notification by adding recipients:
- Click Add
 to add recipients of the notification. You can select the existing Jamf Pro user accounts, or manually add external recipients that are not registered in Jamf Pro.
 - Click Done in the top-right corner of the pane.
- Click Add
After adding a volume purchasing notification, you must enable it.
Renewing your Volume Purchase Token
- In Jamf Pro, click Settings in the top-right corner of the page.
- In the Global section, click Volume purchasing .
- Select the correct location for which you want to renew the token.
- Click Upload Service Token and upload the service token (.vpptoken)
Jamf Pro how-to: Renewing Apple Push Notification Certificates
Share me
Month: January 2023
Push Certificates
A push certificate is an encrypted file generated by Apple that establishes trust between a third-party service like Jamf Pro and Apple Push Notification service (APNs). APNs is the medium through which Jamf Pro commands and information are sent to and from devices. Devices continuously listen to APNs for commands and send messages back to Jamf Pro through APNs after commands have been received.
Each push certificate is valid for one year and must be renewed using the same Apple ID that was used to generate it.
If you have a push certificate in .p12 format, you do not need to create a new one. You can simply upload the .p12 file to Jamf Pro following the instructions in this section.
You can also use Jamf Pro to renew your push certificate when needed.
Note:
Uploading a push certificate to Jamf Pro automatically enables the Enable Push Notificationssetting in Jamf Pro’s Security settings.
Creating a Push Certificate
A push certificate is an encrypted file generated by Apple that establishes trust between Jamf Pro and the Apple Push Notification service (APNs) to allow secure communication to devices enrolled in Jamf Pro.
An assistant in Jamf Pro guides you through the following steps to create a new push certificate (.pem) and upload it to Jamf Pro.
-
A valid Jamf ID. To create a Jamf ID, go to: https://id.jamf.com/CommunitiesSelfReg
-
A valid Apple ID. (An institutional Apple ID is recommended.)
- In Jamf Pro, click Settings in the top-right corner of the page.
- In the Global section, click Push certificates
 .
. - Click New .
- Click Upload
 .
. - Click Edit
 .
. - Click Save .
Uploading a Push Certificate (.p12)
If you have a push certificate that’s in .p12 format, you can upload it to Jamf Pro.
Note:
You will only have a push certificate in .p12 format if the CSR used to create the certificate was not issued by Jamf Pro. Uploading a push certificate to Jamf Pro automatically enables the Enable Push Notifications setting in Jamf Pro’s Security settings.
- In Jamf Pro, click Settings in the top-right corner of the page.
- In the Global section, click Push certificates .
- Click New .
- Select Upload push certificate (.p12).
- Follow the onscreen instructions to upload the push certificate.
Renewing the Push Certificate
Important:
Jamf that you do not delete the existing push certificate from Jamf Pro when renewing a push certificate.
-
A valid Jamf ID. To create a Jamf ID, go to: https://id.jamf.com/CommunitiesSelfReg
-
A valid Apple ID. (An institutional Apple ID is recommended.)
Note:
If you are renewing a push certificate that was originally obtained from Apple’s iOS Developer Program (iDEP), you must use the Apple ID for the iDEP Agent account used to obtain the certificate.
- In Jamf Pro, click Settings in the top-right corner of the page.
- In the Global section, click Push certificates .
- Click the push certificate, and then click Renew
 .
.
Deleting the Push Certificate
Deleting the push certificate from Jamf Pro disables communication between Jamf Pro and APNs. This prevents Jamf Pro from sending macOS configuration profiles and macOS remote commands to computers, and managing iOS devices. In addition, without a push certificate, Mac App Store apps cannot be distributed to computers. To restore these capabilities, you must create a new push certificate, and then re-enroll your computers and mobile devices with Jamf Pro.
- In Jamf Pro, click Settings in the top-right corner of the page.
- In the Global section, click Push certificates .
- Click the push certificate and click Delete
 . Then click Delete again to confirm.

Top 10 Security predications for 2023
Share me
Month: January 2023
Author: January 9, 2023 by Jesus Vigo
Source: https://www.jamf.com/blog/security-privacy-predictions-2023/
As organizations around the world wind down in the steadfast approach toward the end of the calendar year, it’s only natural to reflect on the year about to end. This is a great way for us to learn from what’s come before, assess ourselves and face forward with a newfound resilience.
The focus of this blog is to look beyond what we’ve come through, specifically looking onward to the trends and predictions impacting cybersecurity in 2023. Whether they are existing concerns that are expected to increase in criticality, increased adoption of advanced technologies to shore up security or tangential shifts in how the enterprise looks at, adapts to and remediates against cybersecurity threats – or all of the above.
Make no mistake – if the previous year kept IT and Security teams on their toes – the new year to come will certainly not disappoint if the top ten security trends and predictions for 2023 are any indications of what to expect.
Without further ado…
Top ten
IoT device usage up = security concerns grow too
The Internet of Things (IoT) device type is notorious for its lack of security or implementation of weak security protections. But as more devices like wearables, digital signage and at-home automation surge, ensuring that devices, users and company and/or personal data remain safe from threats will be an increasingly difficult task. In fact, some of the more critical vulnerabilities affecting IoT devices, like default settings, outdated software and weak passwords and data protection schemes are often rooted in a general lack of understanding of IoT security, as well as mismanagement of their connectivity protocols.
While that really only scratches the tip of the iceberg, as they say, the fact remains that the security vulnerabilities outlined above – including other considerations – when multiplied by the just over 40 million IoT devices estimated to be in use by 2025, the risk from IoT devices will only continue to grow and their combined theoretical capability of generating 79.4 zettabytes (ZB) of data.
Pro Tip: 1 zettabyte (ZB) = 1,000,000,000 terabytes (TB)
Remote & hybrid environments still have a difficult time securing data
While it has been several years since the pandemic seemingly shut down most of the world, many organizations worldwide decided to migrate to remote or hybrid work environments to continue business operations in as safe and secure a way as possible. While some organizations have fared better at this transition, others are still finding it nearly impossible to securely protect enterprise data from remote threats.
While several solutions leverage the power of the cloud to maintain endpoint security while upholding privacy and flexibly managing mobile devices of any ownership model, each organization has unique needs that may require jumping through additional hopes before they can crystalize their data protection strategies.
Nation-state attacks expected to increase globally due to elections
The political stage is expected to get added attention in the new year from bad actors backed by nation-states looking to disrupt elections and attack national infrastructures and organizations within countries and regions around the globe. According to the National Democratic Institute (NDI), a non-profit, non-partisan organization that works to support democratic institutions globally, they are tracking many elections scheduled to be held in 2023.
“With geo-political unrest in some of the most powerful cyber nations today, cybersecurity infrastructure is at stake. Nation-state-backed actors are threatening critical national infrastructure and cyber disruption.” – David Mahdi, CSO and CISO Advisor, Sectigo
It’s no secret that the election process has long been a hot-button topic for nation-state actors and hacktivists. Given an already tense political climate in recent years, the continuation of attacks by and against governments and enterprises is expected to accelerate considering the number of elections planned which is certain to test cybersecurity resilience in the coming year.
AI increasingly leveraged in the enterprise against cybersecurity threats
According to a recent Yahoo report, if its forecasted 23.5% growth with projected swell to over $28.09 billion by 2030 are any indicators, artificial Intelligence (AI) and related machine learning (ML) are both advanced technologies whose applications hold a number of keys to unlocking the untapped potential of many industries. Among those benefiting greatly from AI/ML is cybersecurity.
While we’re not exactly Skynet-levels of integration, companies have been leveraging these powerful technologies in behavioral analytics that analyze data streams, obtaining meaningful insights that determine if system behaviors hold patterns to threats and attacks by bad actors, including unknown malware or suspicious movements. The end goal? Gathering valuable threat intelligence information to inform endpoint security software, orchestrate technical controls and perform remediation workflows to secure devices and mitigate threats.
The ability of AI and ML to ingest and process data at rates far beyond what humans are capable ofis a critical component to helping organizations hunt for hidden cyber threats while algorithms in pattern detection reveal vulnerabilities in configurations, apps or security within computing systems.
Additionally, AI’s ability to accurately detect and respond to attacks means it can also defend against attacks much more quickly by calculating what responses to prioritize, effectively and efficiently fending off attacks automatically – without human intervention required or slowing down its efficacy.
The culture surrounding security awareness gaining traction
One would think with such access to informational resources, such as the internet and its ability to access all forms of data from our fingertips that awareness of common threats and scams targeting users would effectively minimize those threats. Sadly, that is not the case as phishing attacks continue to sit at the top of the threat landscape but not all hope is lost as the culture surrounding security awareness has been gaining traction within enterprises.
“91% of successful data breaches started with a spear phishing attack” — KnowBe4
This is especially good news as this of course translates to users adopting a more security-savvy mentality that helps them handle the threats they face daily from both professional and personal spaces. With organizations and users both recognizing the importance of security training, services like KnowBe4 are being leveraged by organizations to further build upon their security knowledge foundation to incorporate proper behaviors to establish a security-minded culture as a means of extending awareness that translates into mitigating risk.
User privacy protections take a priority role within holistic security strategies
Data security is crucial to organizations from a litany of concerns, not the least of which is the interruption to business continuity, exposure to liability from data leakage of protected data types, like PHI and impacts on public perception and reputation. And while PII, or personally identifiable information, has always been a sensitive data type, recently proposed changes to state and regional laws (like GDPR in Europe) have raised its prominence within enterprise security strategies.
Add to the mix remote and hybrid work environments that often rely on personally owned mobile devices as part of their BYOD support model and the criticality to uphold user privacy requires that strategies to keep PII protected are prioritized and built into an organization’s defense-in-depth security strategy to ensure that company data stays safe without compromising user privacy – and potentially – ensuring compliance is maintained.
Passwordless authentication workflows gain prominence
Ah, the venerable password. Next to end-users, this is arguably the second weakest link in the security chain – and for good reason. It seems that for every user that follows the best practices of choosing a unique password, deriving complexity from the mixed use of multi-case characters, numbers and symbols while making sure to not write it down on a post-it note “hidden” under their keyboard or bent back on the monitor’s bezel…there are seemingly thousands of users that cannot be bothered to “remember one more password”.
Even then, all the password policy guidance and enforcement doesn’t matter much when users are willfully giving over their credentials to social engineers. So, what’s the best protection against password-related attacks, you ask? That’s easy – keep data secured by removing the password from the equation!
That’s precisely what passwordless workflows aspire to achieve by leveraging multi-factor authentication (MFA)alongside your trusted device (and its security certificate stored in the Secure Enclave) – let’s call it an iPhone (something you have) – which provides the verification factors like device pin (something you know) and Face ID or Touch ID(something you are) to reimagine the authentication process, simplifying the user experience while simultaneously minimizing risk from the source of “where greater than 80% of all breaches originate.” – compromised credentials, as per Jonathan Locast, Jamf.
Convergence of management and security frameworks
Frameworks are a critical aspect of managing any lifecycle. Whether it’s the device, application, software development or security to name a few, frameworks provide enterprises with a structured, concise and iteratively driven tentpole that encompasses all the facets that go into achieving success – continuing that success – within a given process.
In the case of security, the goals are simple but difficult to hit: bake in secure processes into each component that serves as the building blocks of your defense-in-depth strategy to ensure data security and maximize regulatory compliance while minimizing confusion.
In the case of device management, the goals may vary depending on your unique organizational needs, but they are generally easier to achieve: obtain visibility into each component that serves as the core of your device management solution to ensure that endpoints are actively monitored and that metrics vital to the health of your endpoints are collected to inform decisions moving forward related to maintaining device health, auditing compliance goals and make administrative management as easy as possible.
Two peas from the proverbial same pod, so why not join them so they work together? That’s the idea behind convergence. A holistic approach to security that positions solutions offering device management, identity integration and endpoint security – designed to work together as a single, comprehensive end-to-end solution for centralized management of your Apple fleet.
Cyberattacks exploiting supply chain vulnerabilities continue impacting organizations
It’s no secret that attacks against the supply chain are devastating to, well, everyone.
“82 percent of CIOs believe their software supply chains are vulnerable” — Venafi
Simply put: when it comes to the supply chain, regardless of whether your organization is directly attacked or not, the indirect fallout could still have a disastrous impact on your enterprise’s security posture.
The fact that these cyber attacks expand to include governments, businesses and critical infrastructure not only makes them very critical to protect against but according to a recent Gartner supply chain cybersecurity report, “44% of organizations will substantially increase year-over-year spend” to effectively mitigate risk stemming from these types of attacks.
As attacks in the past have shown, while larger organizations may attribute greater levels of risk – make no mistake about it – supply chain attacks affect businesses of all types and sizes. In a nutshell: “Cybersecurity in the supply chain cannot be viewed as an IT problem only”, underscores the National Institute of Standards and Technology (NIST) in their Best Practices in Cyber Supply Chain Risk Management guide to help enterprises harden their people, processes and knowledge to best protect against breaches.
Zero Trust continues to gain steam by verifying device and credential health before granting access to resources
For those unaware, imagine for a second that the security of your organization’s data was decoupled from the exclusivity of the devices that access it. Meaning that protected data was contained in a secure space that was independent of the level of security of your computer or that of a colleague. And that this same secure system that contained the data you requested would not approve your request until certain criteria were met and confirmed. Access to protected data is denied, by default, so if you do not meet any one of these criteria, access continues to remain denied until you prove otherwise.
Enter Zero Trust. “Never trust – always verify” is the tagline of sorts that best exemplifies the security model at the crux of Zero Trust. It tosses aside known concepts as “trusted” internal networks or the notion that managed devices carry a greater level of implicit trust than unmanaged devices. The concept here is simple: all network traffic, devices and users are considered untrusted regardless of what side of the perimeter they’re requesting access from.
To obtain access to protected resources, like data, apps and services, at a minimum, users must authenticate with their cloud-based identity and the devices they use to request access must be verified by the Zero Trust service as being free from compromise. This device health check that occurs each time a resource is requested may include but is not limited to: ensuring endpoints have endpoint security software installed, are free from malware, have up-to-date patches and meet other forms of security checkpoints deemed critical to enforcing data security.

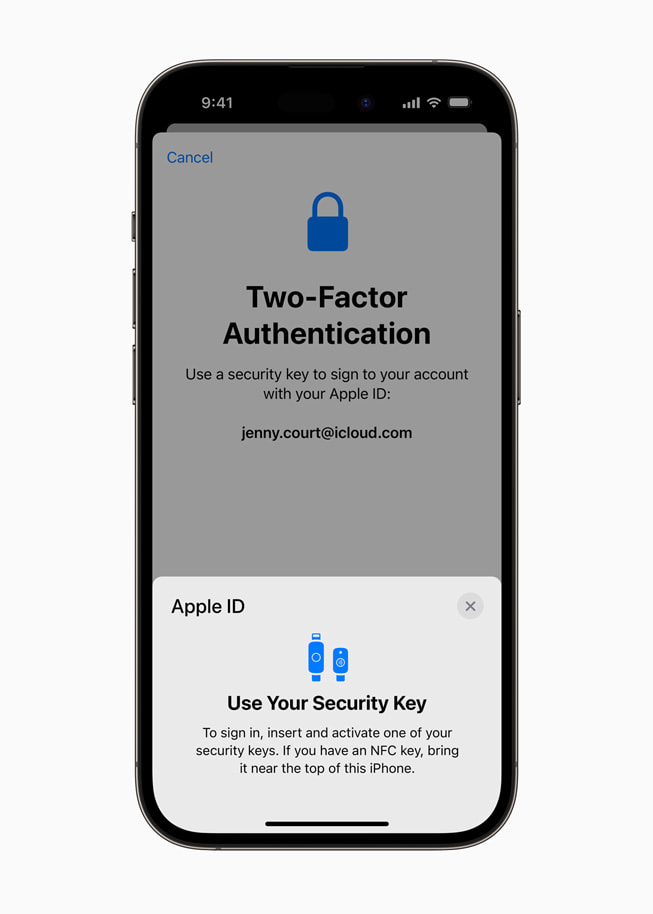
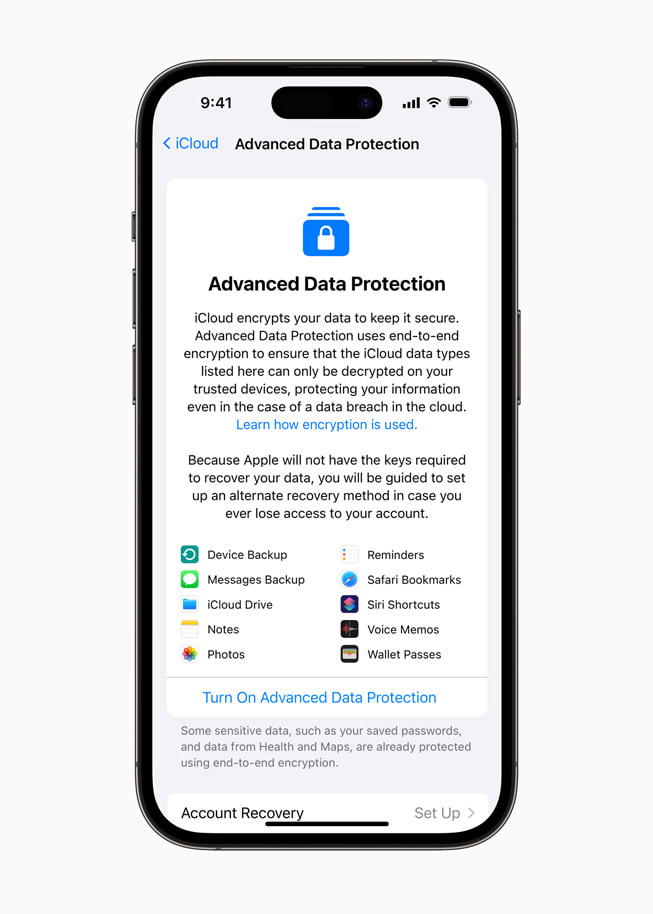
Apple advances user security with powerful new data protections
Share me
Month: January 2023
Source: https://www.apple.com/za/newsroom/2023/01/apple-advances-user-security-with-powerful-new-data-protections/
iMessage Contact Key Verification
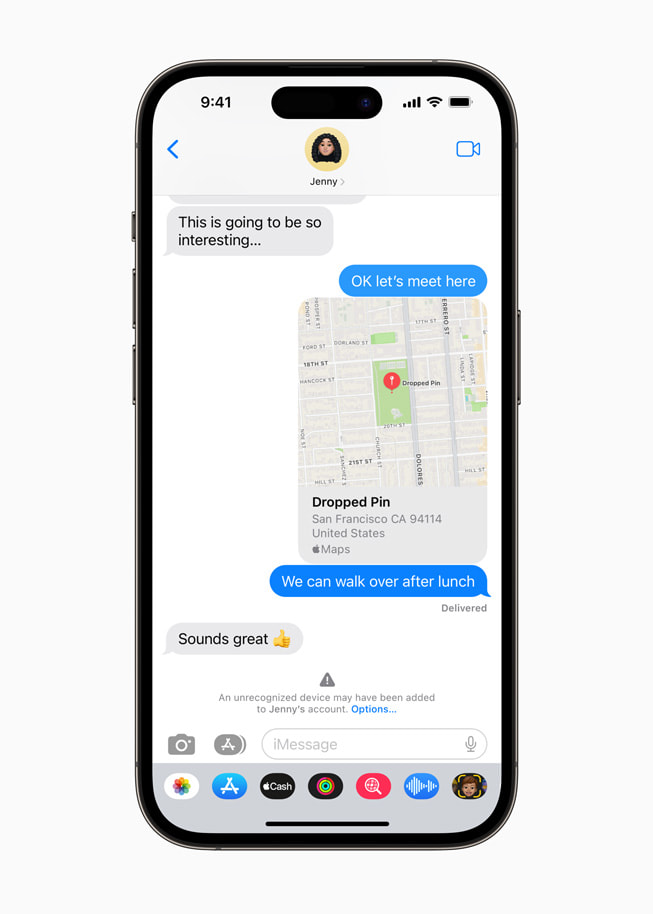
Security Keys
Advanced Data Protection for iCloud
- iMessage Contact Key Verification will be available globally in 2023.
- Security Keys for Apple ID will be available globally in early 2023.
- Advanced Data Protection for iCloud is available in the US today for members of the Apple Beta Software Program, and will be available to US users by the end of the year. The feature will start rolling out to the rest of the world in early 2023.
- A complete technical overview of the optional security enhancements offered by Advanced Data Protection can be found in our Platform Security Guide, along with the data breach research “The Rising Threat to Consumer Data in the Cloud” by Dr. Stuart Madnick, professor emeritus at MIT Sloan School of Management.

The role of IT and the classroom educator: mortal enemies or compadres?
Month: January 2023
In the educational sector, one of the major issues that impact the quality of and how modern education is delivered stems from conflicting points of view between educators and IT services. Specifically, how technology for learning can and should be implemented, as well as who and how it should be managed.
The two sides have very different views of what is needed, what each other’s should be and how often these opposing views come to define the “impact” made within institutions of learning when expectations are not met.
With that said, which side is correct?
Depending on your perspective and experiences, it could be that educators should be provided the hardware and software tools they need to teach students without hindrance. Or perhaps you side with IT in that, equipment and software licenses need to be provisioned against the backdrop of ensuring safe access to educational resources while facilitating device management and keeping data secured.
Let’s dive deeper into the murky waters of each viewpoint to determine which — if any — provides a correct path forward, shall we?
In this corner: Educators
The role of an educator is to, well, teach their students. How they go about translating the lesson plan into a feature and media-rich experience that delights the senses while stimulating the student’s minds is squarely in their wheelhouse.
In the classroom, many educators want control, agency and tools that ultimately support the learning process as well as their own ability to teach effectively. After all, they are in the proverbial “hot seat”, by being tasked with educating the generations to come. So, it shouldn’t really come as a surprise that they expect to be provided with the necessary tools to practice the craft they studied so hard for, allowing them to teach in the most efficient and productive manner possible.
Simply put: asking for the hardware and software tools that work with them to teach — enriching the learning process for students — doesn’t seem like educators are asking for a lot, does it?
The opposition: IT services
Ask any IT support person and they’ll tell you: to perform your responsibilities fully and effectively, you must provide support services to all that request them whileperforming them in a timely manner. Part of this process includes managing the processes that ensure that systems are protected, data is secured and ultimately, things run as smoothly as possible.
The simplest way to achieve this? Manage each and every aspect of a process to ensure that the outcome is both controlled and replicable. However, this is easier said than done when balancing the varying needs of users, each requiring similar (though sometimes wildly different) software applications and hardening configurations — a circumstance not uncommon in the education sector.
Here’s the rub: while focusing on the security and manageability of computing devices, data security and keeping students safe from myriad threats, the workflows required to uphold this ethos often come at the compromise of what tools can(and cannot) be used, which determines how they are required to be used and center around the restrictions necessary to keep stakeholders and institutional data secure.
In other words, endpoints are configured to work in the best, most secure way possible so that devices, users and data stay protected. That makes sense, doesn’t it?
And the winner is…
When you look closely at the two views, you’ll notice that they both differ in their approach, but upon closer inspection, they are more similar at their core than would appear at first glance. In fact, both sides ultimately want the same outcome — that the technology just works and for it to:
- Save both areas time
- Maximize productivity
- Minimize downtime
- Eliminate incompatibilities
- Provision safe access for students
- Secure data and devices from threats
- Provide students with the resources needed to succeed
With more similarities than there are differences driving success in the education sector, perhaps refocusing efforts on combining strengths to minimize weaknesses is the key. And here’s the perfect question to get that ball rolling:
How can both sides become the hero to the other?
Pro Tip: Have them work together!
One of the critical things to bear in mind when planning on impactful changes, such as purchasing equipment to be used in the classroom, procuring software licenses or making adjustments to standards and processes that affect all stakeholders is to have them get in the same room to discuss the variety of needs, wants and “nice to haves”.
Years ago, prior to the global pandemic, IT services were something provided to classrooms. By and large, the process worked fine. A problem arose in the classroom with technology, a work order or request for service was made and IT would swoop in to correct the issue.
It served the purpose to streamline activities sure, but it wasn’t very transformational. Meaning, that there were pockets of great practice where technology was used beyond the basic support model. One where technology didn’t just support learning in a pedagogical fashion, but it served an intrinsic purpose much like books, paper and pencil while allowing students to leverage the latest software and hardware to develop creative expressions of learning across all disciplines.
Not just that, but thanks to its assistive capabilities, it supported a number of exceptionalities, like providing a voice to those students that cannot speak or allowing those with physical disabilities to participate in the classroom in every capacity imaginable.
The problem is that this type of transformation wasn’t as mainstream as one hoped. Fast forward several years to a world that has had to evolve quickly while adapting to a seismic shift to traditional educational processes, like distance learning and we see even the most reluctant educators realizing the power of technology to save time, capture imaginations and improve outcomes.
Similarly, the role of IT has shifted away from the iron-fisted, heavily locked-down computing environment toward one that still provisions devices and manages them, but prioritizes securing data over locking down systems by empowering educators with powerful management tools to support the modern classroom. This shift relieves some of the time spent reactively chasing down issues, allowing IT to invest in proactively being a key part of the learning ecosystem by enabling schools to have a greater impact on classroom outcomes, savings of money and even a positive impact on teacher retention and recruitment.
How do I achieve this utopia, you ask? Each institution will no doubt have its own unique concerns to address, but it all starts with the need for communication and a unified vision. One where IT meets the needs of teaching and empowers learning with flexibility and modern device management practices, whilst educators underscore and uphold the tenets of a safe and secure environment — in the classroom and online.
The whole package now includes management and security, from both IT and Teaching and learning angles.
The solution? Educators and IT + Jamf.
Learn more about how Jamf empowers educators while simplifying IT management tasks helping to provide students, teachers and staff with a safe and secure learning environment.

Jamf releases Jamf Connect 2.19.0
Share me
Month: January 2023
Changes and Improvements
-
The Jamf Connect menu bar application no longer displays a misleading default password requirement.
-
The Jamf Connect login window now has all components visible on resolutions equal or less than 1280×800 px.
-
The Jamf Connect menu bar now reports to Jamf what settings are configured on computers. This data is used to assist our development teams and align with customer interests. This data does not include any Personally Identifiable Information (PII).
-
The Collect Logs function in the Jamf Connect menu bar now prompts users where to save their logs. The downloaded logs also include the user’s version number as a text file.
-
The ROPG Scopes (
ROPGScopes) key for the Jamf Connect login window has been added to allow for custom scopes, which can return additional claims in a user’s ID token during authorization. -
The Disable Update Watcher (
DisableUpdateWatcher) key for the Jamf Connect login window is now available in Jamf Connect Configuration and the Application & Custom Setting configuration profile payload in Jamf Pro.
Resolved Issues
-
[PI110470] When the Jamf Connect login window is enabled, an unexpected progress bar no longer displays and delays the login process.
-
[PI110582] The accessibility options menu can now be accessed from the Jamf Connect login window.
-
[PI110598] Unexpected pop-ups no longer cause the Jamf Connect login window to stop loading and require the user to restart their machine.
-
[PI110693] When the Migrate option is set to True in the Jamf Connect login window, local accounts marked with isHidden no longer appear.
-
[PI110721] Users no longer need to manually reopen the local login window after entering an incorrect password in the menu bar.
-
[CON-4504] The Jamf Connect menu bar password requirements are now correctly displayed in a human-readable format.
Jamf Connect enables organisations to deploy single sign on login to a Mac using Cloud credentials users already know.

What is Jamf School?
Month: January 2023
Jamf’s mobile device management (MDM) school solution means that teachers and IT professionals receive an MDM for education powerhouse for running today’s modern classroom with the best learning technology available: Apple for schools.
Jamf School’s intuitive web-based interface simplifies deploying, conducting inventory and securing Apple devices — while offering teacher workflows and other classroom management assistance.
What Jamf School can do for you
- Simplify classroom management with drag-and-drop functionality
- Show you all device information on one dashboard
- Give automatic access to subject-specific materials for students
- Track damaged devices
- Tackle multiple locations with ease
- Cache content that will be used by multiple students to avoid internet slowdowns
In addition to our purpose-built MDM solution for school, Jamf School also comes with three powerful education apps:
Jamf School Teacher
Combined with Apple Classroom, the Jamf School Teacher app empowers educators to develop learning and teaching opportunities using iPad in the classroom. Giving management tools to limit app and web access, restrict functionality and create lessons to reduce teacher workload.
Jamf School Student
This powerful app empowers students to set up their own devices, communicate with teachers, store documents in their personal iCloud drives — and more.
Jamf School Parent
This app supports parents and home use with devices. This app allows parents to restrict usage for specific times throughout the day. They can also receive a notification when a child gets to school or arrives home.
Secure Apple in Schools
The final piece of the puzzle: security and privacy for education users. Jamf School’s integration with Jamf Safe Internet supports student safety through content filtering and network threat intervention.
Ready to empower teachers, students, parents and IT professionals with an intuitive purpose-built MDM school solution?

Jamf Connect how-to: Managing license files
Share me
Month: January 2023
Jamf Connect license files are easy to update and distribute to your fleet of Macs with Jamf Pro. In this video, we show the simple process of creating a Configuration Profile that only contains the LicenseFile key for Jamf Connect.
When renewal time comes around, simply copy the new license file from account.jamf.com and paste into Jamf Pro, update the config profile and distribute to all machines.
Step by Step Instructions:
- Navigate to Computers → Configuration Profiles.
- If this is the first time you’re distributing a Jamf Connect license to your fleet, create a new Configuration Profile with the “+ New” button in the upper right corner of the screen.
- If you’re updating an existing profile, select and edit it.
- In the General tab, name your profile something that you’ll remember and your fellow administrators will understand. Categories help sort config profiles in Jamf Pro to make it easier to find when updating later.
- Scroll down on the left-hand toolbar to the Applications and Custom Settings payload. Select the option for “JamfApplications”. You’ll be adding two configurations to one profile: com.jamf.connect and com.jamf.connect.login.
- Select whatever is the latest version of the profile. LicenseFile is a common key that has existed since the beginning, so it will still work if you’re distributing an older copy of Jamf Connect. Select the JamfConnect.json schema built-in to Jamf Pro.
- Use the Add/Remove Properties option to remove all the keys EXCEPT the LicenseFile.
- Repeat this process to get the configuration for Jamf Connect Login and Jamf Connect menu bar. Keep this tab open.
- Open a new tab in your web browser and navigate to account.jamf.com. Log in with your Jamf Nation credentials and select the Jamf Connect info from the Products tab.
- In the section for License, you have an option to copy the license info to the clipboard. Select this to copy the license to your clipboard.
- Return to the tab with Jamf Pro and paste the license file key into both the config for Jamf Connect Login and Jamf Connect menu bar.
- Save the configuration profile and select the “Scope” tab to target machines in your fleet which use Jamf Connect.
Special notes:
If you are renewing your license, check for any other configuration profile that applies to Jamf Connect. Only one LicenseFile key can be applied at a time. Misconfiguration may produce unexpected results in the Jamf Connect application if there are multiple LicenseFiles applied at the same time.