
How-to: On-Device Content Filtering with Jamf Safe Internet
How to
Author: August 25, 2023 by Anthony Darlow
Source: https://www.jamf.com/blog/how-to-on-device-content-filtering-with-jamf-safe-internet/
Step into the cybersecurity of the future.
Jamf Safe Internet has recently added On-Device Content Filtering (ODCF).
Apple provides this technology as part of iOS and iPadOS. ODCF enables network filtering directly on the device, which makes it a much more comprehensive filter.
Secure students and devices with On-Device Content Filtering.
Newest Jamf Safe Internet release
With this release, ODCF has added the ability to filter IP addresses on top of domain names— which Jamf Safe Internet has always done. However, the scope for ODCF technology is much broader than this.
It’s now possible to filter full URLs, ports and identify traffic that originates from specific apps. ODCF is also lower in the network stack than VPN, which means even if students install a VPN, their device will still filter content before going through the tunnel.
This technology is also very privacy-preserving. A huge amount of sensitive data is stripped from requests, and since ODCF evaluates the traffic data on-device, it doesn’t need to go to Jamf’s security cloud for evaluation.
This release didn’t just add the ODCF capabilities to Jamf Safe Internet. It also changed the default vectoring method to Apple’s “DNSSetting” payload, moving from a VPN-vectoring method. It’s this “DNS over HTTPS” (DoH) that enables Jamf Safe Internet to continue to provide web-based threat prevention.
It’s now done by making the most of Apple’s native frameworks.
New To Jamf Safe Internet?
This release has been optimized for devices running iOS and iPadOS 16+.
Jamf Pro
- If you are a new Jamf Safe Internet customer and have devices running iOS or iPadOS earlier than version 16, you will need to ensure that you deploy the legacy profile to these devices.
- If you are using Jamf Pro to deploy Jamf Safe Internet and have devices running iOS or iPadOS earlier than 16, you will need to need to follow the Getting Started with Jamf Safe Internet in Jamf Pro section of our Jamf Safe Internet documentation.
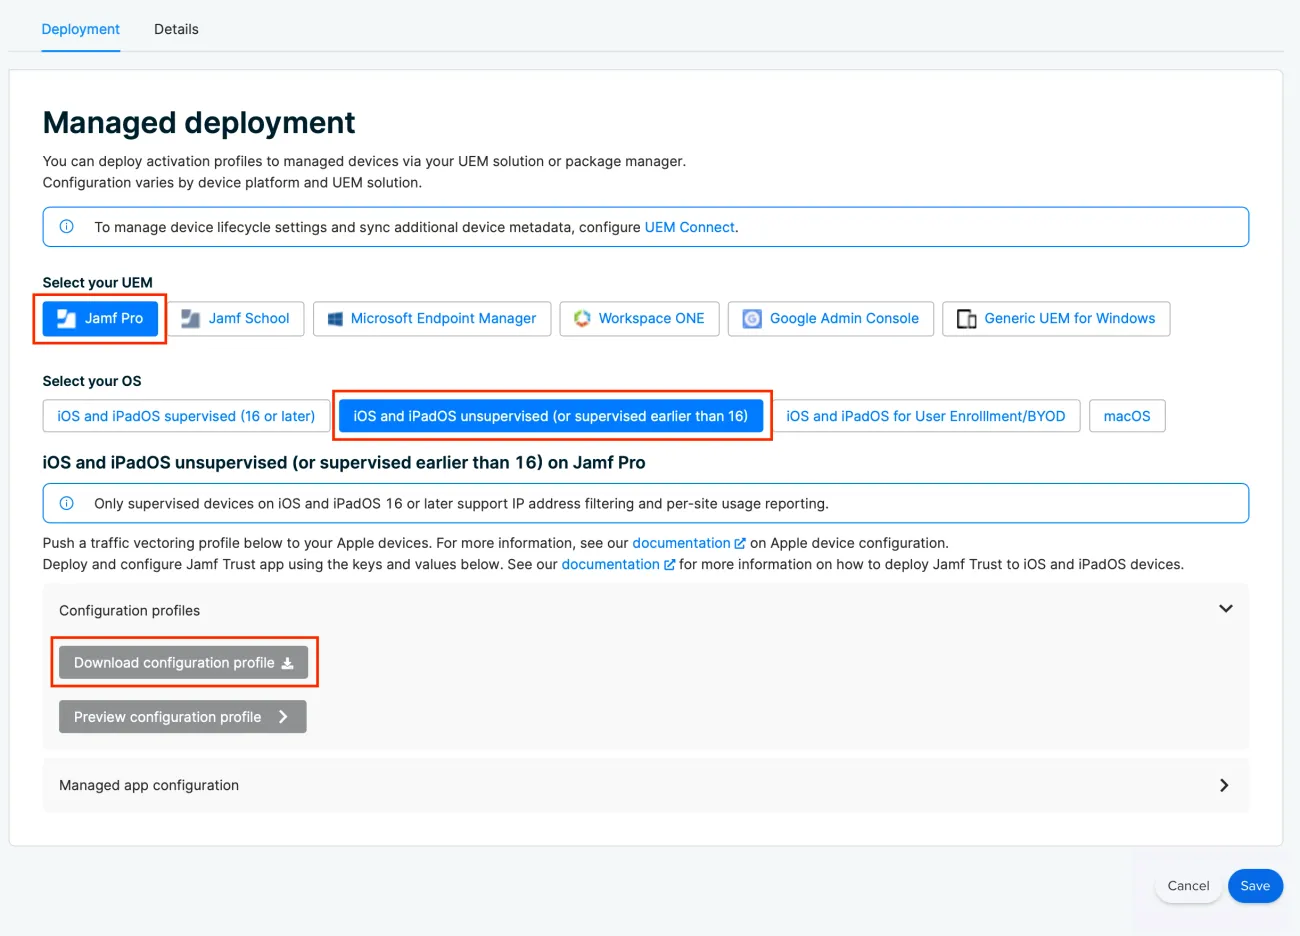
Where the guide says: “Download the relevant configuration files and complete the Jamf Pro instructions,” you will need to select the configuration profiles from the Jamf Safe Internet console under “iOS and iPadOS unsupervised (or supervised earlier than 16).”
Follow the rest of the guide, but be sure to scope this configuration profile only to devices with iOS or iPadOS earlier than iOS 16. You can do this using Smart Groups. For environments using both iOS and iPadOS 16+ as well as earlier, repeat the process but choose the configuration profile under “iOS and iPadOS supervised (16 or later).”
Jamf School
If you are using Jamf School to deploy Jamf Safe Internet and have devices running iOS or iPadOS earlier than 16, you will not be able to use Jamf School’s built-in single-click connection. Instead:
- Log into the Jamf Safe Internet console and select the default activation profile.
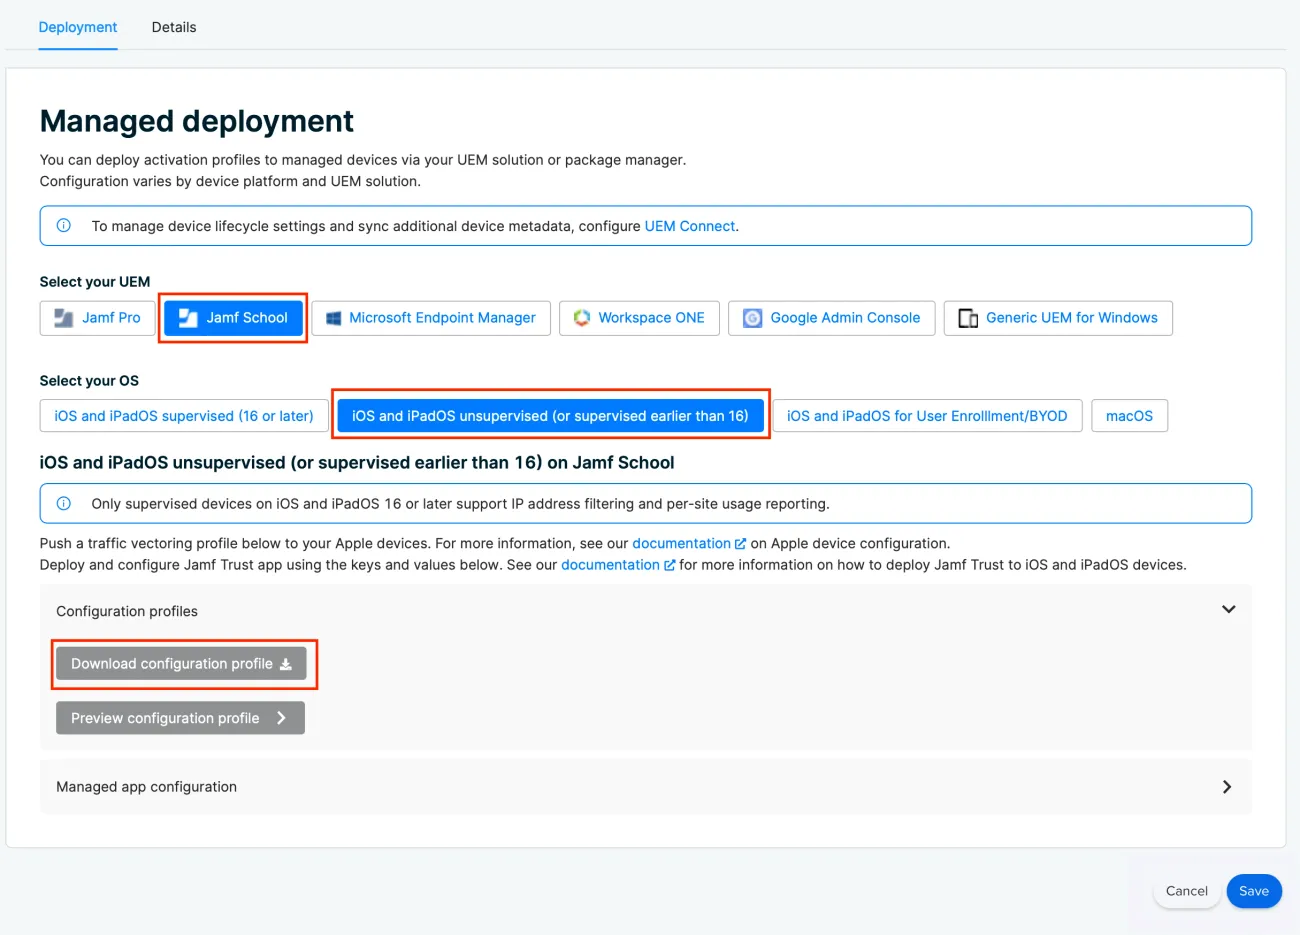
- Under “Select your UEM,” choose “Jamf School.”
- Under “Select your OS,” choose “iOS and iPadOS unsupervised (or supervised earlier than 16).”
Then, download the configuration profile from the console.
Once you have this profile, upload it to School Jamf as a custom profile and scope it, along with the Jamf Trust app, only to devices with iOS or iPadOS earlier than iOS 16. You can do this with Smart Groups.
For environments using both iOS and iPadOS 16+ as well as earlier versions, use the built-in single-click connection for devices 16+, and use the above method for devices with an iOS or iPadOS earlier than 16.
Already have Jamf Safe Internet?
If you already have Jamf Safe Internet deployed to your devices prior to the release of ODCF, all of your devices will be using the legacy profile.
- If you have devices that are running an iOS or iPadOS version earlier than iOS 16, you will not need to take any action. Jamf Safe Internet will continue to run in its legacy form (using a VPN vectoring method and without ODCF capabilities.).
- If you have devices running iOS or iPadOS 16+ and would like to make use of the new DoH and ODCF capabilities, you will need to migrate your devices from the legacy deployment.
The migration has a number of steps and is a simple process. However, it’s extremely important that you follow all the steps as outlined here. Otherwise, there is the risk that your devices may not filter content in the expected way.
Step 1: Create an activation profile that has the new DoH and ODCF configuration populated.
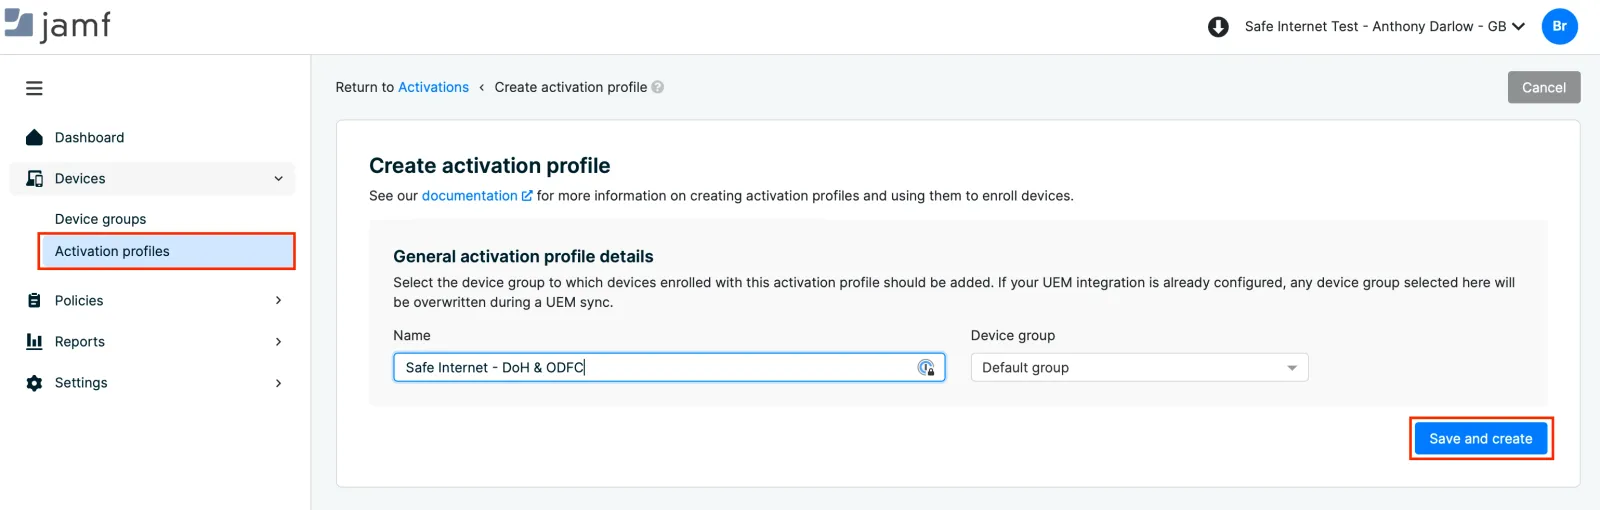
- Log into your Jamf Safe Internet console and navigate to Devices → Activation Profiles → and select “Create Profile.”
- Name the profile according to your environment’s needs. I would suggest something that includes DoH and/or ODCF so that you know that this is the new profile and it’s using the new method over the older legacy profile you used before.
- Select “Save and Create.”
- In the next window, do not change any settings and select “Save.”
Step 2: Create a Jamf Safe Internet profile in Jamf School.
- Log into your Jamf School console and navigate to Profiles → and select “Create Profile.”
- Create the profile by selecting “iOS” → “Device Enrollment.”
- Name the profile according to your environment’s needs. I would suggest something that includes DoH and/or ODCF so that you define the new profile when deploying.
- Select “Finish.”
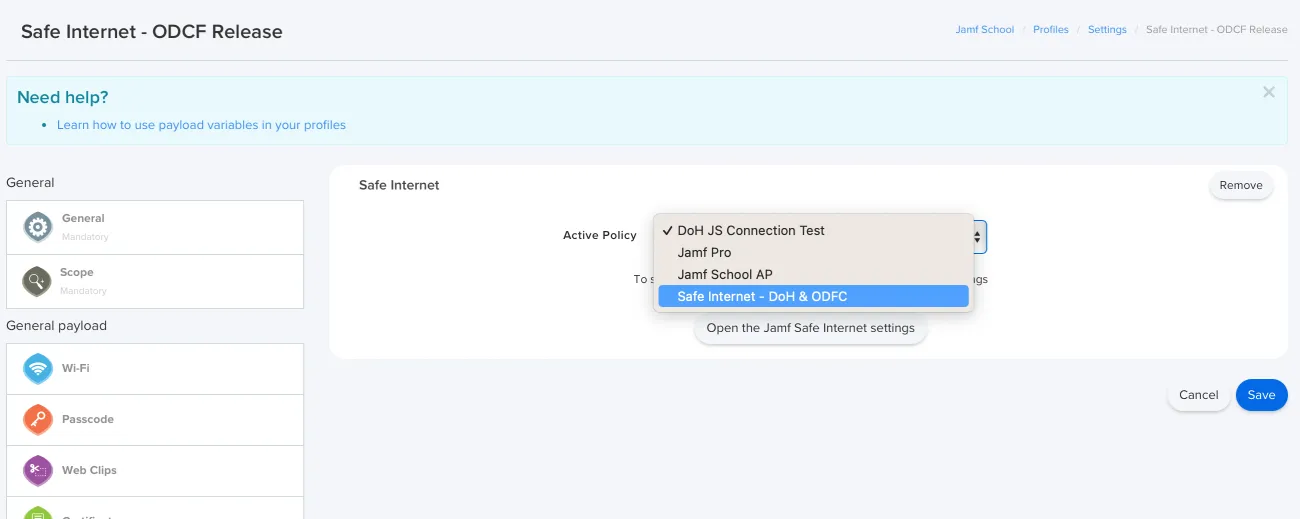
- Scroll down to the “Safe Internet” payload and select “Configure.”
- From the dropdown menu, select the activation profile that you created.
- Select “Save.”
Step 3: Remove the legacy deployment from your devices.
Before deploying Jamf Safe Internet with the new DoH and ODCF capabilities, first:
- Remove the legacy vectoring method from devices.
- Remove the device record from Jamf Safe Internet. This is very important.
Here’s how to do it:
- In Jamf School, un-scope the current Jamf Safe Internet profile from the devices. This will be unique to each environment depending on how you configure groups and settings, but be sure to only un-scope the Jamf Safe Internet profile.
- Un-scope the Jamf Trust app from devices. This will be unique to each environment depending on how you configure groups and settings, but be sure to only un-scope Jamf Trust. At this point, please be aware that the devices are no longer filtered by Jamf Safe Internet.
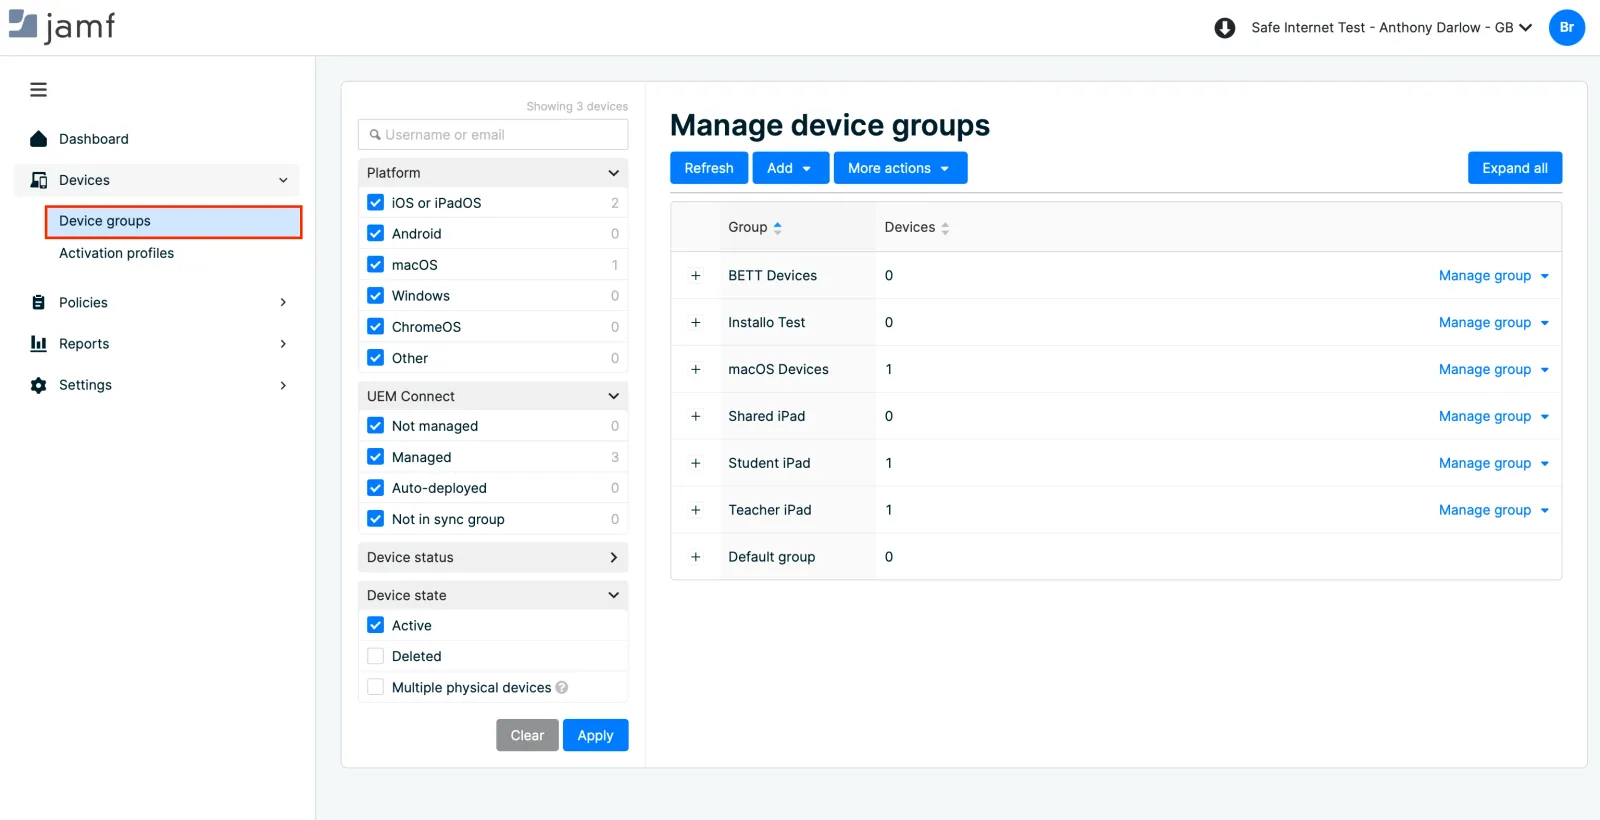
- Move over to the Jamf Safe Internet console and navigate to Devices → Device groups.
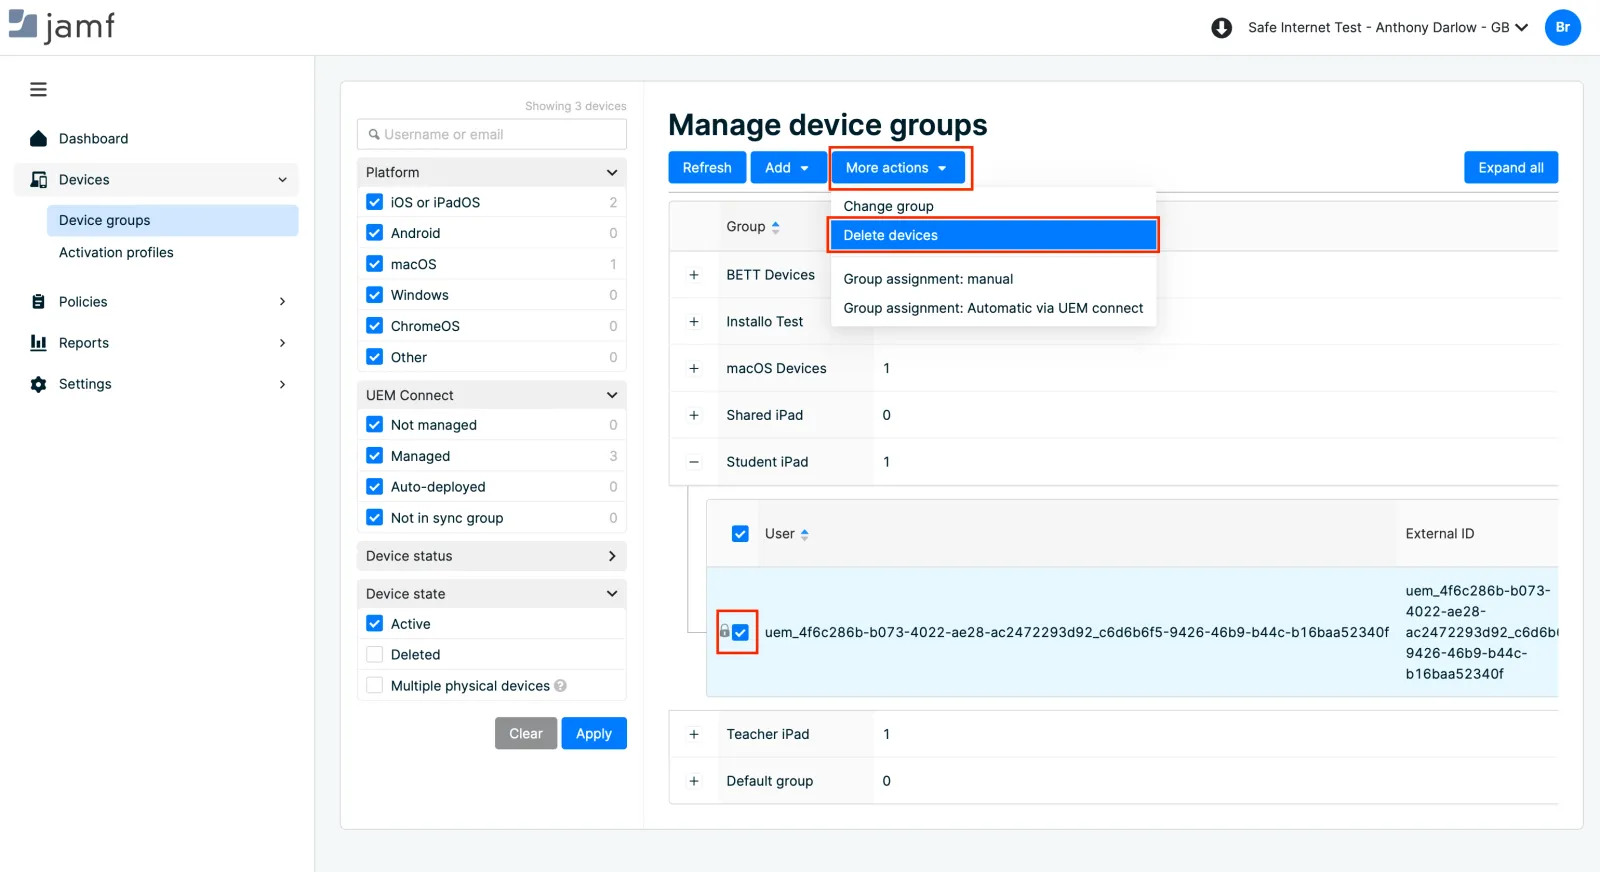
- Select the devices or group of devices that you are migrating (ensuring that you’ve already removed the profile and Jamf Trust from them within Jamf School) by selecting the checkbox next to the devices.
- Click “More actions” and select “Delete devices.”
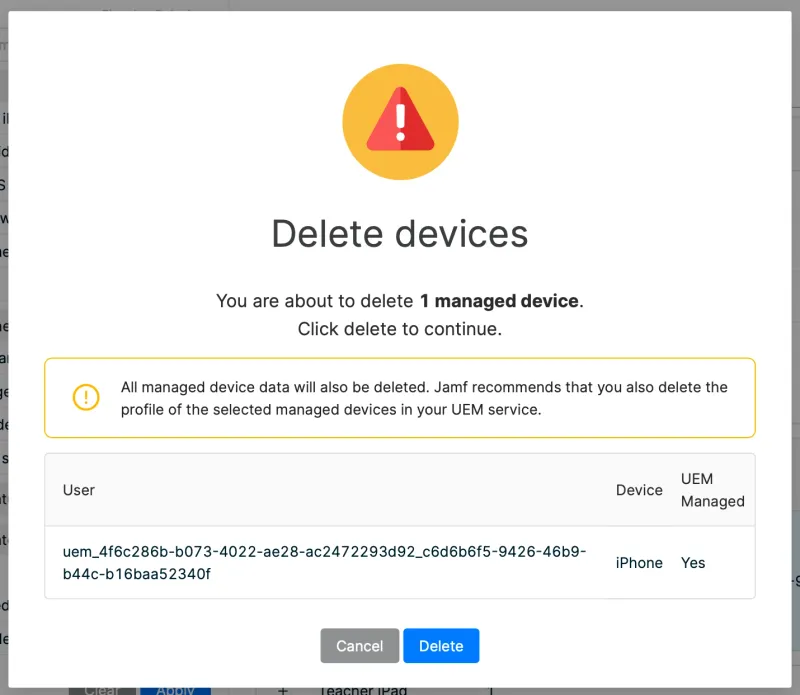
- In the next window, read the information and select “Delete.”
Step 4: Deploy Jamf Safe Internet using the new profile created in step two.
Now that your devices have fully been removed from the legacy deployment, you can re-deploy Jamf Safe Internet to the devices using ODCF.
- In Jamf School, scope the profile with the DoH and ODCF configuration created in step two to devices. Remember that DoH and ODCF are suitable for iOS and iPadOS 16+.
- Scope Jamf Trust to the devices (it doesn’t require a managed app config.)
At this point, devices are once again protected by Jamf Safe Internet and you will see devices start to appear in the Jamf Safe Internet console.
How to check that devices are using DoH and ODCF
Regardless of if your deployment is new or you have migrated from the legacy method, you can check on the device to ensure that it has a DoH and On-Device Content Filter payload.
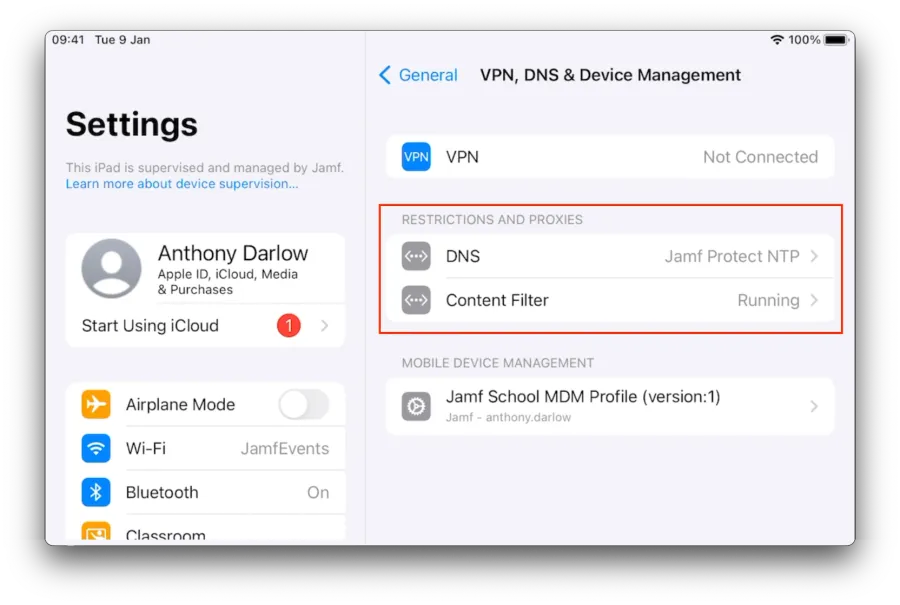
- On a device, navigate to Settings → General.
- Find and select VPN, DNS and Device Management. This option will only say VPN and Device Management if a device does not have a DoH and ODCF payload.
- Under “Restrictions and Proxies,” you will see entries for “DNS” and “Content Filter.”
As a side note, unless you have also deployed a VPN, selecting “VPN” should show no configuration.
What will my users see when ODCF or DoH blocks them?
Jamf Safe Internet keeps students and teachers safe in three ways:
- It prevents students from accessing inappropriate content by blocking certain categories.
- It can also enforce Google Safe Search so that only suitable search results and images appear.
- It keeps students and teachers safe by protecting against web-based threats, such as phishing links or spam websites.
What the end user sees on the device will depend on what content is blocked. If blocked by a category, the user will see the OS block message that is standard for the ODCF protocol.
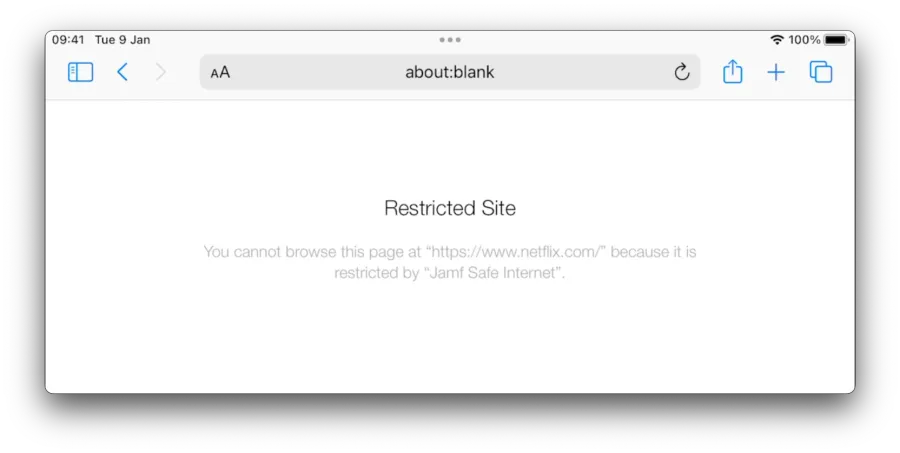
However, if the blocked content is a web-based threat prevention, such as a phishing site, the user will be presented with a Jamf-branded block page.
![Block screen reads: [Jamf logo] Security Risk Identified The site you are attempting to view is insecure and has been blocked. For more information, please contact your administrator. Site classification: Phishing.](https://media.jamf.com/images/news/news-2022/jsi_odcf-10.webp?q=80&w=900)
How do I block IP addresses?
First, you must add them to your policy as a custom rule.
- In the Jamf Safe Internet console, navigate to Policies → Content policies and ensure you are editing the policy at the correct level (OU) for your needs (Root, Lead or Group).
- Select “Custom Rules.”
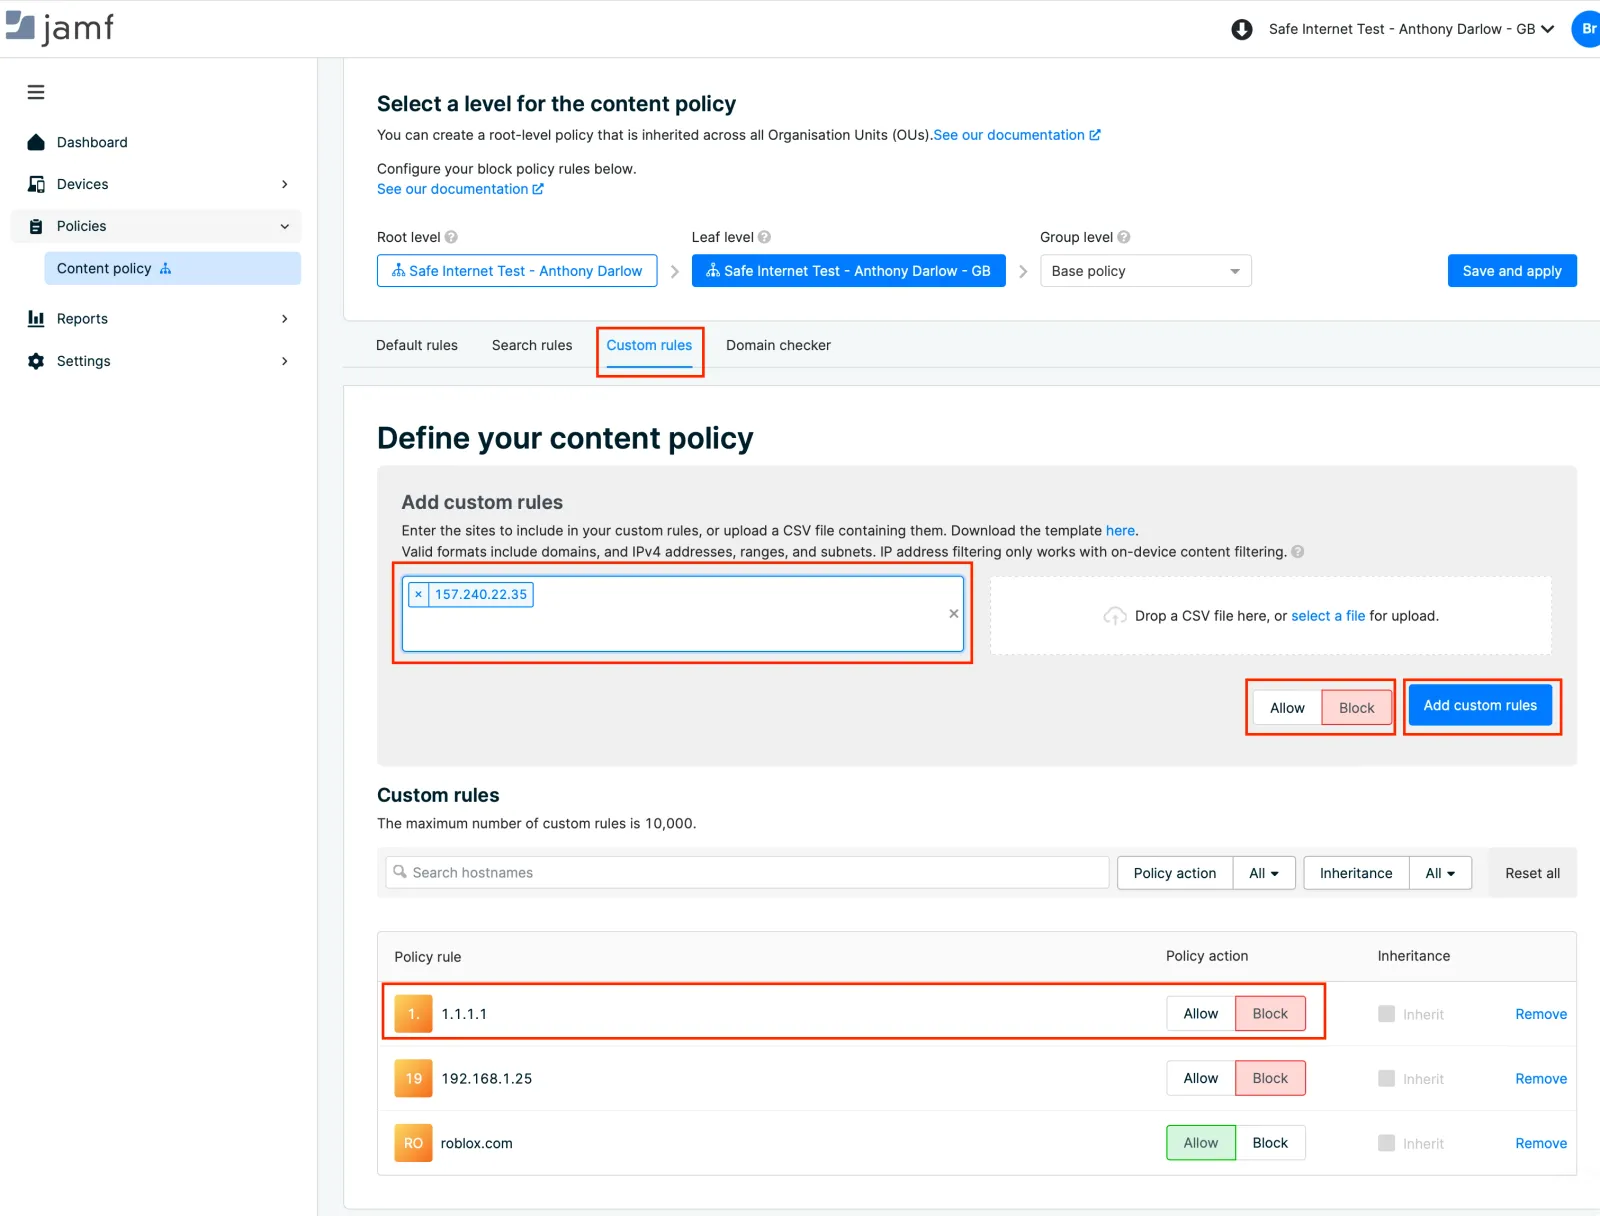
- Enter the IP address(es) you wish to block into the “Add custom rules” box.
- Choose “Block.”
- Select “Add Custom Rules.”
- You will then see your custom rules in the list.
- Make sure to select “save and apply” so that these changes are delivered to devices.
Remember, IP address filtering is possible thanks to ODCF and is only available for devices with iOS and iPadOS 16+.
What does On-Device Content Filtering do for my school?
This release of Jamf Safe Internet is super exciting as it brings more features in line with Apple’s native technologies; it is also more comprehensive and robust. While IP address blocking is great for those who need it, being lower in the network stack allows you to filter even with a VPN on the device. This is a much-needed addition; ODCF is bringing us the feature set of the future.
Yes, there’s a bit of work to migrate to make sure your devices are using DoH and ODCF. However, if clever students have bypassed filtering using IP addresses or VPNs, the benefits outweigh the work.
If you’ve never had this happen in your school, now would be a great time to move to DoH and ODCF before it does. This is the future of Jamf Safe Internet, so why wait?
Try Jamf Safe Internet for free.

Use Swift with the Jamf API, Part 6: Putting it all together
How to
Author: June 1, 2023 by Armin Briegel
Source: https://www.jamf.com/blog/use-swift-with-the-jamf-api-part-6-putting-it-all-together/
All the previous parts have been leading up to this. We have built a command line tool to explore how we can get data out of the Jamf Pro API and use it in Swift. Then we also generalized the code and learned how to get the password out of the Keychain. In the last part, we put together the UI for our app with sample computer objects. Check out the other parts here:
- Part 1: Command line tool
- Part 2: Decoding data objects
- Part 3: Optimizing the code
- Part 4: Implementing a new object
- Part 5: Build the app!
In this part, we will connect the Swift UI interface with the actual live data from the Jamf Pro API.
Controlling the data
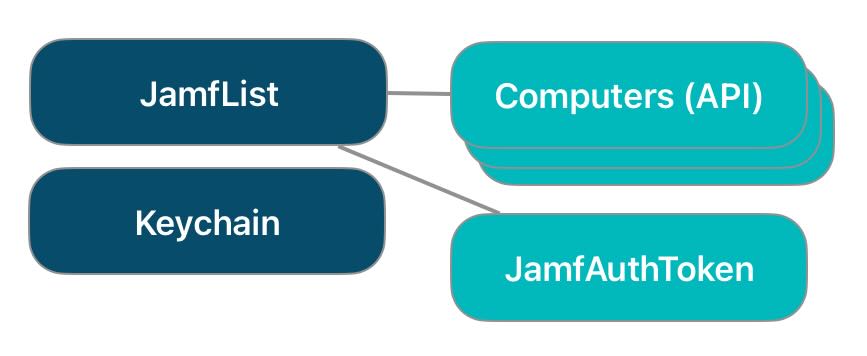
When we look at the code for our command line tool, we can separate the types into two categories. The JamfAuthToken and the types that implement the JamfType protocol interact with the Jamf Pro API and represent the data or ‘model’ that we are working with. The JamfList interacts with the data and controls the workflow. The Keychain object also to a lesser degree controls some data flow.
For the simple needs of our command line tool, a single class was sufficient for controlling the data and printing it out to the terminal.
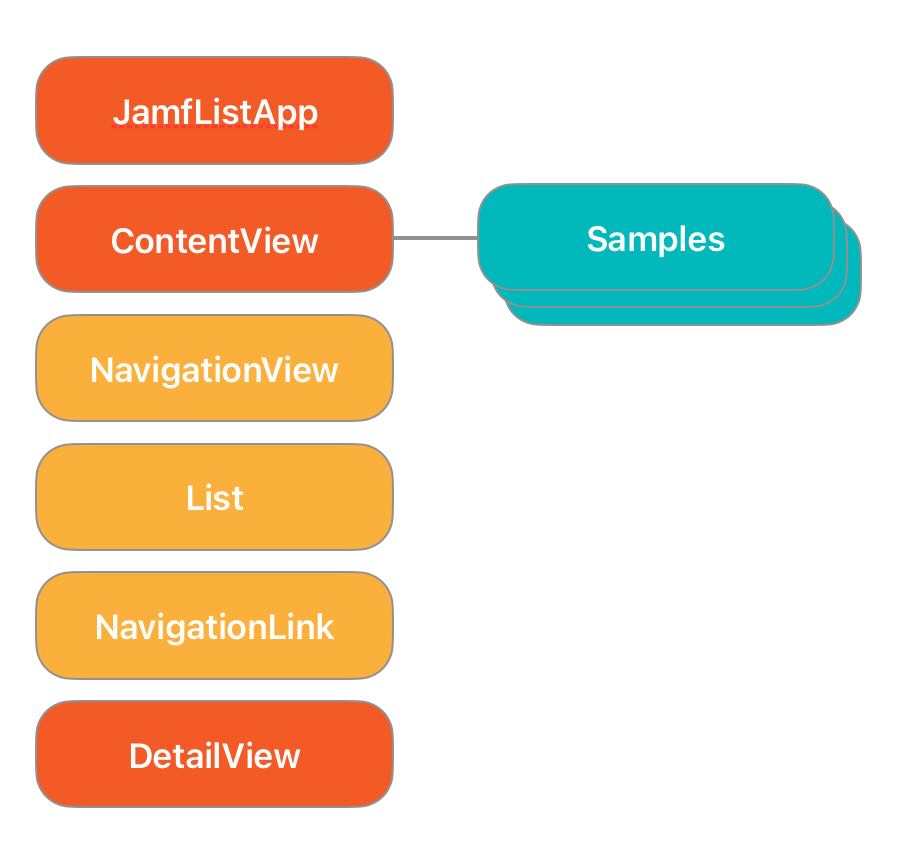
In our Mock SwiftUI app with just the sample data, we are using six UI types that interact with the sample data. The sample data is just an array of computer objects. However, when you look at the structure, only the ContentView object has a direct connection to the sample data. The ContentView object passes the necessary data over to its sub-views.
It is tempting to put the logic to control the data objects into the ContentView object. For an example as simple as this, we might be able to get away with it, but it will get very messy with anything more complex. The standard approach here is to separate an app into three layers. The model (data), the view (user interface) and an intermediate controller layer.
To connect our view types with the data from the Jamf Pro API, we will create a controller object, which does the work of getting the data and presenting it to the view objects in a form they can work with: an array of computer objects.
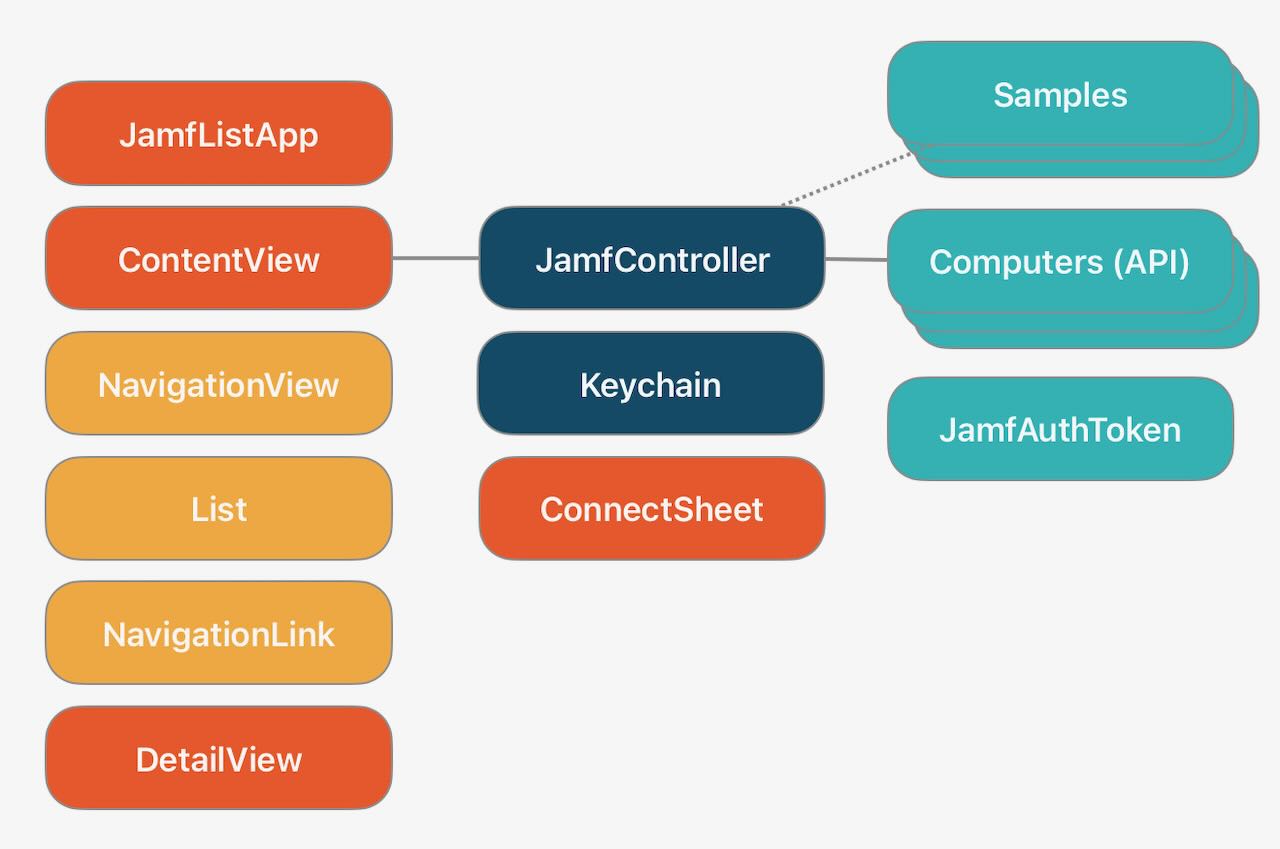
The controller will also have to handle getting the information required to connect and authenticate to the Jamf Pro API, the server, username and the password. In the command line tool, we got those from arguments. In a user-facing app, we will need some user interface (ConnectSheet) and a means of storing the access data between app launches.
We also want the controller to know when it is being used for Xcode internal previews and keep using our sample data then.
You can tell the controller is very crucial. The controller is the central object in our application. It will take a similar position to the JamfList object in the command line tool and we will be able re-use some of the code we built for the CLI tool. First, we need to build the ability to get a JamfAuthToken, and then we can fetch data from the Jamf Pro API.
We are now adding functionality to our app that requires reaching out to a remote server for information. Sandboxed apps require a special permission or ‘entitlement’ to reach out to remote servers. To tell Xcode to add that entitlement, select the blue project icon in the file list, then select the grey ‘JamfList’ app in the list of targets. In the tab on the top, select ‘Signing & Capabilities’, then scroll down until you get to the ‘App Sandbox’ section. In there, check the ‘Outgoing Connections (Client)’
@Published var computers: [Computer] = []@Published var isLoading = false
@Published var needsCredentials = false
@Published var connected = false
@Published var hasError = false
var server: String { UserDefaults.standard.string(forKey: “server”) ?? “” }
var username: String { UserDefaults.standard.string(forKey: “username”) ?? “” }
var password = “”
var auth: JamfAuthToken?
@MainActor
func load() async {
isLoading = true
defer { isLoading = false }
if ProcessInfo.processInfo.environment[“XCODE_RUNNING_FOR_PREVIEWS”] == “1” {
// preview mode return sample data
computers = Computer.samples
return
}
// not in preview mode
// simulate loading time
try? await Task.sleep(nanoseconds: 3_000_000_000)
// for now, also return sample data
computers = Computer.samples
// and set an error, just for the UI
hasError = true
}
}
This object inherits behavior from ‘ObservableObject.’ This is a type in the Combine framework, which allows for other objects to observe and react to changes in this object. The JamfController type has a number of properties that are ‘Published’ which means changes to them might trigger behavior elsewhere, in our case the user interface views.
We also have properties for the server, username and password. The server and username are read directly from UserDefaults, which means they will be read from the app’s property list file.
There is one function ‘load,’ which is marked as an asynchronous function which has to run on the main thread. Apps can have multiple threads, but interaction with the user interface has to happen in the main thread. The ‘@MainActor’ tag ensures this.
The function sets the ‘isLoading’ property to true. Since this property is ‘@Published’ the user interface class will get notified of this change. This allows us to dynamically change the UI and show a progress wheel. Code in the ‘defer’ block will be executed whenever the current code block is left, no matter whether it happens through an early return, a throw statement or at the end of the function.
Then we test if the code is running in Xcode preview. If so, we set the ‘computers’ property to the sample data and leave. When not in preview mode, we wait for 3 seconds to simulate loading time, then set the ‘computers’ property to the sample data and also set the ‘hasError’ property. This is all test code to see if all the pieces of the user interface are working. We will add proper functionality later.
We have not connected JamfController to the view objects yet. Replace the ContentView struct with this:
@StateObject var controller = JamfController()var body: some View {
NavigationView {
if controller.isLoading {
VStack {
ProgressView()
Text(“Loading…”).foregroundColor(Color.gray)
}
} else {
List(controller.computers) { item in
NavigationLink(item.general.name, destination: DetailView(computer: item))
}
}
// placeholder view for detail
Text(“Select an Item”)
.foregroundColor(Color.gray)
}
.task {
await controller.load()
}
.toolbar(id: “Main”) {
ToolbarItem(id: “Error”) {
if controller.hasError {
Image(systemName: “exclamationmark.triangle.fill”)
.foregroundStyle(.secondary, .yellow)
.imageScale(.large)
}
}
ToolbarItem(id: “Connect”) {
Button(action: {
controller.needsCredentials = true
}) {
Label(“Connect”, systemImage: controller.connected ? “bolt.horizontal.fill” : “bolt.horizontal”)
}
}
}
}
}
We have replaced the ‘computers’ array with a property that contains a JamfController object. This is also marked as a ‘@StateObject’ which means that SwiftUI will observe and react to changes in this object.
In the body of the ContentView, we check the ‘isLoading’ property of the controller and show a progress spinner when it is set, or the List when it is done. We are using the Swift control statements in the declarative ‘body’ section of the SwiftUI view class. This is a really powerful feature of SwiftUI. Not only can we easily ‘list’ UI elements, but we can dynamically change the state or the entire composition of a view depending on data in observed objects in the model.
At the end of the NavigationView, we added an ‘task’ modifier, which runs the controller’s load() function. The task modifier will be run before the view is displayed for the first time. We have to wrap the function in a ‘Task’ because it is asynchronous.
We also added two toolbar items. One is merely a status that displays when the controller’s ‘hasError’ property is true. The other is a button that will show an empty or filled bolt icon, depending on the controller’s ‘connected’ property. When you click this button it sets the ‘needsCredentials’ property in the controller. This will not do anything else yet, but later we are going to use that as a trigger to prompt the user for the connection data.
Since the controller object recognizes when it is running in Xcode preview, you should see the sample data there. When you run the app, you should see the spinning wheel for a few seconds and then also see the warning icon for an error. You can also click the connect button, but it doesn’t really do anything yet.
We have set up the JamfController and hooked it up to the ContentView, but so far it isn’t doing anything more than providing the sample data. The challenge is that we need to get the server, username and password before we can get any data from the Jamf Pro API. In the command line tool, we could get the access credentials from the code or later the arguments, but in an app we have to put up a user interface and find a place to store the data between app launches.
When the app launches the controller will have to check if it has all the required credentials. When it doesn’t, it needs to ‘tell’ the view objects to present an interface for the user to enter the credentials. When the controller has all the credentials, it can request an authentication token from the Jamf Pro server. When that succeeds it can fetch the computer records and display them.
Most of this logic will happen in the JamfController class. Add this function to the JamfController class
func connect() async {
// do we have all credentials?
if server.isEmpty || username.isEmpty {
needsCredentials = true
connected = false
return
}if password.isEmpty {
// try to get password from keychain
guard let pwFromKeychain = try? Keychain.getPassword(service: server, account: username)
else {
needsCredentials = true
connected = false
return
}
password = pwFromKeychain
}
if auth == nil {
// no token yet, get one
auth = try? await JamfAuthToken.get(server: server, username: username, password: password)
if auth == nil {
// couldn’t get a token, most likely the credentials are wrong
hasError = true
needsCredentials = true
connected = false
return
}
}
// we have a token, all is good
needsCredentials = false
hasError = false
connected = true
}
You may get an error that it doesn’t know the ‘Keychain’ type here. When you get that, select Keychain file in the project and make sure is both the CLI tool and the JamfList app enabled under ‘Target Membership’ in the File Inspector.
This function checks if it has the server url and username, attempts to retrieve a password from the Keychain, and then tries to fetch an authentication token with those credentials. The function is written in a way that if it already has a password or an authentication token, it will do nothing, so we can call the function repeatedly without creating excessive calls to the Keychain or Jamf Pro API.
If any of those steps fails, it will change the needsCredentials flag to true. When it succeeds at retrieving an auth token, it will set the connected flag to true and the other flags to false. Since these properties are marked as ‘@Published’, the view classes will be re-evaluated when these flags change. That means the user interface we build reacts immediately to changes in our controller class.
In the ‘load’ function in JamfController, replace all the code below the // not in preview modecomment with:
// not in preview mode
// attempt to get an auth token
await connect()
When you run this, nothing will happen. We still need to add the code in the ContentView that reacts to change of the flags. In the ContentView file, insert this code after the closing brace of the ‘NavigationView’ block and before the ‘.task’ modifier:
ConnectSheet(
show: $controller.needsCredentials,
controller: controller
)
}
This will create an error, because the ConnectSheet view does not exist. Create a new SwiftUI View file named ‘ConnectSheet’, make sure it is assigned to the ‘JamfList’ target and replace everything below the import statement with:
struct ConnectSheet: View {
@Binding var show: Bool
@ObservedObject var controller: JamfController
@State var saveInKeychain: Bool = false
@AppStorage(“server”) var server = “”
@AppStorage(“username”) var username = “”
var body: some View {
VStack {
VStack {
Form {
TextField(“Jamf Server URL”, text: $server)
.frame(width: 400)
TextField(“Username”, text: $username)
SecureField(“Password”, text: $controller.password)
Toggle(“Save in Keychain”, isOn: $saveInKeychain)
}
}.padding()
HStack {
Spacer()
Button(“Cancel”) {
show = false
}
.keyboardShortcut(.escape)
Button(“Connect”) {
Task { await connect() }
}
.keyboardShortcut(.defaultAction)
}.padding()
}
}
func connect() async {
// hide this sheet
show = false
if saveInKeychain {
try? Keychain.save(password: controller.password, service: server, account: username)
}
await controller.load()
}
}
struct ConnectSheet_Previews: PreviewProvider {
static var previews: some View {
ConnectSheet(show: .constant(true), controller: JamfController())
}
}
There is a lot going on here. First, ConnectSheet’s ‘show’ property is a ‘Binding.’ This means its value is directly connected with the variable passed in its initializer, in this case JamfController’s ‘needsCredentials.’ The binding goes both ways, so when we change the ‘show’ value in ConnectSheet it will change ‘needsCredentials’ in JamfController and vice versa.
We also connect to the JamfController object directly, since we need to retrieve and store the password value from there. This is an ‘@ObservedObject’ connection, since the ConnectSheet does not own the controller object. You can learn more about the different kinds of connections between view and data objects in SwiftUI in this WWDC 2020 session: Data Essentials in SwiftUI.
The server and username variables are connected through ‘@AppStorage’ to the app’s defaults property list. AppStorage is the SwiftUI counterpart to Foundation’s UserDefaults.
When you run the app now, you should get the connect sheet immediately. This is what is happening on the app’s first launch:
- The ContentView is created, which also creates the JamfController object
- The ContentView runs its attached ‘task’ which runs JamfController’s ‘load’
- JamfController’s ‘load’ sets the ‘isLoading’ property to true, which makes ContentView display the ProgressView (a spinning wheel) in place of the List
- No matter how the load function exits, the deferred action will change ‘isLoading’ back to false, which replaces the spinning wheel with the list of computers
- Then it calls the ‘connect’ function, which determines that it requires credentials, and sets ‘needsCredentials’ to true
- Changing ‘needsCredentials’ to true is the trigger for the ‘sheet’ part in ContentView, which displays the ConnectSheet
- The user enters the credentials in the ConnectSheet
- When they hit the ‘Connect’ button, the server and username are stored in the app’s defaults (through @AppStorage) and the password is stored directly in the controller object
- The ConnectSheet’s ‘show’ variable, which is connected to the controller’s ‘needsCredentials’ is set to false, which also hides the sheet again (as this is the criteria to show the sheet in ContentView)
- The password is stored in the keychain if the user checked that option
- controller.load() is called again, which calls controller.connect(). Should it fail again, the process will start over and the ConnectSheet will reappear
When the credentials are correct, the app will get a token. You will see nothing right now other than the connect button in the toolbar changes from an empty lightning bolt to a solid one. We have yet to implement the code to actually load and show the computer objects.
Once you have entered the correct credentials and selected “Save in Keychain,” the next time you launch the app, it will get the server and username from the app’s preferences, the password from the Keychain, and log in automatically. You will see that the app switches from not connected (empty lightning bolt) to connected (solid lightning bolt).
If you need to make the app “forget” the stored credentials, you can delete the defaults file with this command in the Terminal (you will have to use the Bundle identifier you chose for the app):
defaults delete com.scriptingosx.JamfList
You can also use the defaults command to inspect or manipulate the data that is stored for the app. This can be useful for debugging.
This was a lot of ground work just to get connected. The next step is to actually load the computers from the Jamf Pro API. Add the following code at the end of the load function in JamfController, after the await connect():
// only continue if connected
guard connected, let auth = auth else { return }
if let fetchedComputers = try? await Computer.getAll(server: server, auth: auth) {
computers = fetchedComputers
} else {
hasError = true
}
We verify once more (cannot be careful enough) that we have received an auth token. Then we call the getAll function on Computer. If that successfully returns a list of computers, we replace JamfController’s computer property. Since the ‘computers array’ is a published property, the ContentView will update immediately on this change.
When an error occurs when fetching the computer list, we set the hasError variable to true. This variable is connected to the ‘error’ toolbar item which will display for warning icon. This is very rudimentary error handling. For a useful app, you should use a ‘do… catch statement’ and display some message to user explaining what went wrong.
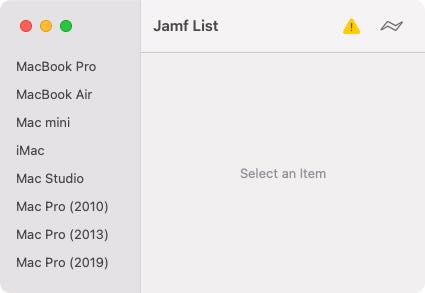
Build and run the app; you should see a list of computer from the Jamf Server and be able to look at the detail information. Congratulations!
You can find the sample code of the app at this point here in the repo.
Extra bonus: In the toolbar of Xcode, where it says ‘JamfList > My Mac’ click on the ‘My Mac’ and select one of the iPads in the list. Then re-build and run the project again. This will launch the app in the iOS simulator. Because SwiftUI is designed to work across Apple platforms, the code we built for Mac will “just work.” There are a few cosmetic issues and the Keychain code needs adapting, but the fact that is mostly works is quite impressive. You can also test the app running on an iPhone by choosing an iPhone from the device list.
This sample app is far from finished. Even aside from the cosmetic issues on iOS (and to be honest the current incarnation of the Mac app), there is much left to do. You could quite easily display more property fields from the Computer record. You can also add more types of objects though you’d have to choose a way in the UI to switch between the different types. You may also want to add functionality to edit data in the records and update the data in Jamf Pro through the proper API calls.
This tutorial has kept us busy for six installments. I consider it complete for now. I may or may not address some of these issues in the future, but I believe you now have the fundamentals and insights necessary to tackle these challenges yourself. Good luck and enjoy!

How to use Apple Business Manager to manage App licenses
How to
Author: April 18, 2023 by Jesus Vigo
Source: https://www.jamf.com/blog/use-abm-to-manage-app-licenses/
Ask users and administrators alike what part of maintaining devices proves to be the most challenging and you’ll likely encounter different answers depending on their perspective. While the top choice may differ from one organization to the other based on needs, there’s certainly no doubt that among the top challenges lies managing the application lifecycle effectively.
In this blog, we discuss the ways in which Apple administrators can leverage Apple Business Manager and Jamf solutions to manage the entire application lifecycle effectively and holistically by integrating both solutions for efficiency and seamless support.
What is the application lifecycle and how does it work?
Though it’s often mostly associated with software development, the application lifecycle is a five-step model that aids administrators tasked with comprehensively managing apps that get deployed to end users and devices.
The entire process is iterative and cyclical. Meaning that each phase is documented and used to inform the phase that follows it in the model through lessons learned. Upon reaching the final step, it continues in a loop back to the first step, continuing through all the phases once again.
Not focusing specifically on a specific management task, like procurement or deployment, the entire lifecycle focuses on holistically managing all aspects related to applications. The entire process is broken down into five categories:
- Plan: Determine the solution that the app(s) will provide to a problem and determine requirements and dependencies, if any.
- Develop: Begin work on programming your app or, in the case of this blog, take the appropriate steps to procure the necessary app licenses.
- Test: Straight-forward testing of the solution to verify that it meets organizational needs and does not introduce new forms of risk.
- Deploy: Mass deployment of the app(s) to end-users and devices.
- Maintain: Perform tasks to ensure apps are patched and kept up-to-date.
Before we dive into it further, let’s first recap what Apple Business Manager is and why it’s a critical component of application lifecycle management.
What is Apple Business Manager (ABM)?
Apple Business Manager combines the power of Apple’s Automated Device Enrollment, formerly Apple Device Enrollment Program (Apple DEP), and Volume Purchasing, formerly Apple Volume Purchase Program (Apple VPP), in one consolidated service to allow you to automatically deploy Mac, iPad, iPhone and Apple TV devices directly to users — configured with settings, security controls, apps and books.
Why did ABM replace VPP?
Apple’s Volume Purchase Program, or VPP for short, was the name given to the centralized console which organizations use to purchase and distribute apps to the Apple devices in their fleet. This includes macOS, iOS, iPadOS and tvOS-based devices.
VPP, alongside Device Enrollment Program (DEP), served as two separate programs that allowed MacAdmins to manage apps and device enrollments respectively. While both programs still exist, they have found a new home in Apple Business Manager.
In consolidating these programs into one console, ABM provides a central platform for administrators to manage device enrollments across multiple locations, including apps and provides a system for integration with cloud-based solutions, like MDM and identity providers (IdP). This extends the service to provide centralized management and assignment of user accounts, solutions integration, app, book, and media procurements, and manage Apple services that require federation, like managed iCloud accounts.
How are app licenses assigned?
ABM is integrated directly with the App Stores for macOS, iOS/iPadOS and tvOS. This means that MacAdmins can procure apps by license count versus a single instance of an app like consumers do when navigating the App Store from their devices.
The benefit of this model is that organizations can effectively request any number of licenses for a given app in one fell swoop. Regardless of whether the app is a free or paid app, the organization can implement a payment system (like credit or PO) to cover the costs of paid apps and manage the total number of licenses from the console.
For example, if downloading the Jamf Reset app that is used in organizations to quickly refresh devices assigned to multiple users, admins can simply search for the app by name and then select the number of licenses they need, then complete the “purchase”. Even though this app is free, ABM will communicate with the App Store to grant the organization the number of licenses requested, usually within seconds.
Once the “purchase” is completed, the total number of licenses will appear under the Apps section and be made available to be assigned to devices and/or users.
Device-based license assignment
Licenses can be assigned one of two ways. The first of which – and the most common assignment type – is based on the device.
Consider this the method to use for the general deployment of apps commonly used by all users of a particular device. A good example of this would be Google Chrome, with most users of a device utilizing the third-party browser for web surfing duties.
User-based license assignment
The second assignment type is based on the user and not the device itself.
Using this method, users can rest assured that regardless of the device they are assigned, the apps they need to remain productive are always available. This is especially true in environments with shared devices, like hospitals. Also, it is helpful in instances relating to paid apps, where perhaps one user requires this app but others do not. This way, the app seemingly “follows” the user wherever they may go, irrespective of the device they’re using at any given moment.
It should be noted that app assignment types may be used interchangeably without issue. Often, a best practice is to assign any apps used by all users to the devices themselves, while apps that are used by only certain users, in special circumstances or when app licenses are limited to only those users that will be using it.
Learn more about Jamf and Apple!

Jamf School how-to: Renew APNS certificates and ASM Tokens
Share me
How to
You must have a push certificate in Jamf School to manage devices with Jamf School. Devices enrolled prior to May 2, 2017 are managed by a push certificate in Jamf School. To check if your devices are managed by Jamf School, navigate to Settings > Apple Push Notification Service. If the Push Topic is “com.apple.mgmt.XServer.01ab0995-0663-4e2d-a001-25e9ef3eaf9e”, the devices are currently managed by Jamf School. You must create your own certificate for future enrollments. If a new certificate is created, enrolled mobile devices will not be able to receive MDM commands unless they are re-enrolled. Apple requires the Apple Push Notification service (APNs) certificate to be renewed every year.
Important:
If the original Apple push certificate expires or is deleted, you must manually re-enroll all managed devices.
If you are renewing a push certificate that was originally obtained from Apple’s iOS Developer Program (iDEP), you must use the Apple ID for the iDEP Agent account used to obtain the certificate.
Note: Apple recommends that you use one corporate Apple ID for push certificates and a separate one for Apple School Manager.
Renewing an Apple Push Certificate
- In Jamf School, navigate to Organization > Settings in the sidebar.
- Click the Apple Push Notification Service payload.
- Click Renew Push Certificate.
- On the pop-up dialog, click Download Certificate Signing Request. The certificate signing request (.csr) downloads.
- In a new window or tab, navigate to the Apple Push Certificates Portal: https://identity.apple.com/pushcert
- Log in to the portal with your Apple ID.
- Click Renew next to the current Jamf School certificate.
- Upload the certificate signing request you downloaded from Jamf School.
- Click Upload, and then click Download. The Apple push certificate (.pem) will download.
- Return to the Jamf School tab in your browser. In the pop-up dialog, upload the Apple push certificate.
- Click Apply.
Renewing or Replacing a Service Token from Apple School Manager
- Log in to Apple School Manager at https://school.apple.com.
- Click on your account name in the lower-left corner, and then choose “Preferences”from the pop-up menu.
- Click Payments and Billing.
- Under the Apps and Books tab, click the correct server location token. The token downloads to the Downloads folder on your computer.
- Navigate back to Jamf School and upload the server token.
- In Jamf School, navigate to Settings in the sidebar.
- Click the Content (Volume Purchasing) payload.
- Click Replace
 on the token you want to renew.
 - Upload the token file (.vpptoken) that you downloaded from Apple School Manager.
- Click Apply.

Working with Internal Services and Jamf Safe Internet
Share me
How to
Author: November 30, 2022 by AntD
Source: https://community.jamf.com/t5/tech-thoughts/working-with-internal-services-and-jamf-safe-internet/ba-p/279011
Earlier in the year, we released our education-focused security tool, Jamf Safe Internet, which focuses on keeping students and teachers safe online. As the adoption of Jamf Safe Internet increases, so do the use cases. A common use case that has become clear in the months since release is the ability to connect to internal services, such as file servers (for storing data), web servers (for platforms like Moodle) as well as a host of others.
Due to the way that Jamf Safe Internet is designed to push all DNS requests to the DoH Gateway in our Security Cloud to evaluate domains against allow/block & security policies (fig1), education institutes aren’t able to access internal services without some advanced configuration.

fig 1 – basic diagram of Jamf Safe Internet flow
In order to better understand why we need to add the advanced configuration to our Jamf Safe Internet deployment, you will require a basic knowledge of networking, particularly around what and how DNS works. If this is new to you or you would like a refresher, here is a video from AWS and in the first 5 minutes or so talks about DNS at a high level – What is DNS?
Accessing Internal Services Without Jamf Safe Internet
First, we’ll look at how a device would typically connect to an internal service, without Jamf Safe Internet. Let’s take an example of a school that has a file server onsite, and this is where students store their data. When a device connects to the school’s network, thanks to DHCP, it gets given a number of networking information, including an IP address and a DNS server (where the device should look to convert IP addresses into human-readable addresses and vice versa). Generally, there is a local DNS server onsite which contains the entries for the internal domain (this is configured and maintained by the schools network admin) which in our example will be myschool.local
(fig 2) When the student tries to access the file server they type in “file.myschool.local” the device starts an exchange with the DNS server (whose IP address was given to the device via DHCP, when it connected to the network). If the device and the DNS server where people, the conversation would go something like this:
Device: “Hey DNS Server, the student is looking to go to file.myschool.local and I like numbers, not words. Can you tell me the IP address for file.myschool.local please?”
DNS Server: “Sure and if I don’t know what it is I can ask one of my friends out on the internet. Let’s see, myschool.local…..I know about that domain. Just let me check the IP address for file.myschool.local…..here you go, it’s 10.0.0.20.”
The device then has the information that it needs talk to the file server by connecting via its IP address that it now knows, and the student is presented to the shared folder that they requested. The student is then able to get on with the tasks that have been set.

fig 2 – flow of accessing internal resources without Jamf Safe Internet
Accessing Internal Services With Jamf Safe Internet
This time we’ll take the same example but add Jamf Safe Internet into the mix. Everything starts the same as last time. When the device connects to the school’s network, thanks to DHCP, it gets given a number of networking information, including an IP address and a DNS server location (in the form of an IP address).
(fig 3) Only this time we have also installed Jamf Safe Internet. Jamf Safe Internet is installed through a Profile which was installed via MDM, containing a payload which includes a DNS setting. Therefore, the DNS setting is a managed preference.
Preferences managed via MDM on Apple Devices will always supersede any setting of the same kind that appears on the device (this is due to the way Apple devices look for resources, starting with managed, then user, then local, then system).
This means that although the device is given a DNS server address via DHCP the device will always use the DNS setting it was given via MDM. In this case the DoH Gateway in Jamf Security Cloud.
When the student tries to access the file server they type in “file.myschool.local” the device starts an exchange with the DNS server. This time, thanks to the managed preference, the DNS server is our DoH Gateway, which sits outside of the education institute’s internal network. If the device and the DNS server were humans, the conversation would go something like this:
Device: “Hey DNS Server, the student is looking to go to file.myschool.local, and I like numbers, not words. Can you tell me the IP address for file.myschool.local please?”
DoH Gateway: ”I don’t know anything about myschool.local. In fact, nobody on the internet knows anything about myschool.local. So…I can’t tell you the IP address, you’re looking for somewhere that doesn’t exist.”
Device: ”Oh okay, sorry. I’ll have to tell the user that I cannot find or connect to where they have requested.”
The student is then presented with a ‘cannot connect to server’ type of message and is not able to complete their tasks for that lesson.

fig 3 – flow of accessing internal resources with Jamf Safe Internet
Local Bypasses
As you can see, since Jamf Safe Internet is pushing all DNS requests to an external DNS server (the Jamf DoH Gateway) the device is not able to communicate with the local DNS server which contains the information needed.
We can, however, add some additional key pair values into the Activation Profile that enables access to the internal services while keeping the device protected with Jamf Safe Internet. The information that we will add will essentially tell the device if it’s trying to get an IP address of a particular domain (which we will list), then instead of using the DNS server listed in the managed preference, use your ‘default’ DNS server. Generally, this will be the one given to you via DHCP (the internal one that WILL know about myschool.local)
Below we will look at 3 ways to create these bypasses depending on platform or OS. All workflows do require modifications to a profile in XML, so you will need to be comfortable with this and have a suitable editing tool at hand.
Creating Local Bypasses for macOS
- First, log into Jamf Safe Internet and navigate to Devices → Activation Profiles.
- Then click on the activation profile.

- Next, you will see under “UEM Configuration Profiles” the profile for macOS Devices.
- Click the > to the left-hand side and then click the words “this configuration profile” to download the profile to your computer.

- Once downloaded, find the profile and open it with your editor of choice.
- Scroll through the XML until you find a section called “OnDemandRules”.
- From there you will see that we are evaluating the connection and never connecting to a list of domains.
- In our standard DoH profile, (which is currently used for macOS only) we already see a list of domains for Jamf and Apple.
- We simply add our local domain (or specific servers via FQDN) to this list.

- Once you’ve added the required bypasses, save the profile and upload it to Jamf School / Jamf Pro using the ‘Upload Custom Profile’ option.
- Then, scope this profile to the device instead of the standard macOS profile that is
- a) created as part of the ‘singleclick’ connection in Jamf School
- b) the standard macOS profile you download and install in Jamf Pro
Devices with an Activation Profile configuration as the above will then be protected via Jamf Safe Internet, but will also be able to reach resources located on the internal network such as file servers or web servers that aren’t externally accessible.
If you have devices already activated in Jamf Safe Internet and then need to issue a new Activation Profile with the local bypasses please note the “Device Enrollment” section of the Known Issues in the Jamf Safe Internet Documentation.
Creating Local Bypasses for iOS/iPadOS
Before looking at how to create local Bypasses for iOS/iPadOS we need to quickly understand why an iOS/iPadOS deployment of Jamf Safe Internet is configured in a different way than macOS.
With macOS we were able to deploy the “DNS settings” payload just the way it was intended by Apple as a management preference. When this setting was enforced on iOS/iPadOS 15 or below, there was a known product issue in the OS. Although the device will apply the managed DNS settings, if the device is turned off and back on again it ignores the managed DNS setting, though the profile is on the device.
To tackle this, Jamf Safe Internet was instead deployed through a VPN payload, ensuring that even after a device restart the device sent all traffic through the DoH Gateway.
With the release of iOS/iPadOS 16 the bug has been addressed and the DNS setting payload behavior is as expected. At the time of writing, Jamf Safe Internet is deployed via the VPN payload as default, regardless of if the device is running iOS/iPadOS 16 or greater. However, since you are editing the Activation Profile, if you would prefer to deploy to iOS/iPad 16 or greater via the DNS Setting payload you could.
At this point it’s worth noting that since the default (for all iOS/iPad versions at time of writing) vectoring of VPN is still valid on iOS/iPadOS 16 or greater, should you wish to move to using the DNS setting payload in your environment, rigorous testing is recommended.
Devices with iOS/iPadOS 15.7.1 or below & iOS/iPad 16 or Greater
For these devices we will use the standard vectoring method, using the VPN payload. This one is a little harder to configure since the groundwork is not there for us already in the Activation Profile. You can use the Apple Developer Documentation to help find the required keys.
Since iPhone and iPad can have both Cellular and Wi-Fi connectivity, we can add bypasses (or different bypasses) on both interfaces. However, as we are looking to connect to internal resources we are only interested in the bypasses when on Wi-Fi as this is the interface you’d expect to be connected to when on a local school network.
- First, log into Jamf Safe Internet and navigate to Devices → Deployment → Activation Profiles.
- Then click on the activation profile.

- Next, you will see under “UEM Configuration Profiles” the profile for iOS/iPadOS Supervised Devices.
- Click the > to the left-hand side and then click the words “this configuration profile” to download the profile to your computer.

- Once downloaded, find the profile and open it with your editor of choice.
- Scroll through the XML until you find a section called “OnDemandRules”.
- Next look for the following section:

- Keeping the Action – Connect key in there will automatically bring up the VPN connection.

- Under this section, you’ll add some additional XML (you can refer to the Apple Dev Doc’s to find out more).

- Essentially you are saying, like with the macOS example, evaluate the connection and if it’s one of the listed domains do not use the VPN to tunnel traffic.
- In the example I’ve also added the same bypasses as are in the macOS DNS Settings payload for Jamf & Apple, but this isn’t required.

- Once you’ve added the required bypasses save the profile and upload it to Jamf School / Jamf Pro using the ‘Upload Custom Profile’ option.
- Then, scope this profile to the device instead of the standard iOS/iPadOS profile that is
- a) created as part of the ‘singleclick’ connection in Jamf School
- b) the standard iOS/iPad profile you download and install in Jamf Pro
Remember, if you have devices already activated in Jamf Safe Internet and then need to issue a new Activation Profile with the local bypasses, please note the “Device Enrollment” section of the Known Issues in the Jamf Safe Internet Documentation.
Devices with iOS/iPad 16 or Greater
Once again, at this point it’s worth noting that since the default (for all iOS/iPad versions at time of writing) vectoring of VPN is still valid on iOS/iPadOS 16 or greater, should you wish to move to using the DNS setting payload in your environment, rigorous testing is recommended.
This is maybe the simpler of the two options. Since the “DNS setting” is a universal setting (it’s something that can be used on both iOS and macOS) and the DNS setting bug has been figured out, you simply just need to follow the same steps as above for creating a profile with local bypasses for macOS.
We still want to be installing the Jamf Trust app along with the config profile, which is not a requirement for macOS.
As a reminder, here is the part of the profile you are looking to edit:

When downloading the activation profile from the Jamf Safe Internet console, you still download the macOS profile (as per the screen shot), even though you are looking to configure this for iOS/iPadOS. Since it’s a universal setting Jamf School / Jamf Pro will allow you to scope it to either macOS or iOS/iPadOS.
If you are running Jamf Safe Internet on both macOS and iOS/iPadOS, your iOS/iPadOS devices are on 16 or greater, and have already created a bypass profile for macOS. No need to create a second for iOS/iPadOS! You can use the same one since it’s a universal setting.
Ready to protect your students online?
Jamf Pro how-to: Automated Device Enrollment Integration and Renewal
Share me
How to
Automated Device Enrollment Integration
Apple’s Automated Device Enrollment, also known as zero-touch deployment, immediately enrolls and configures a device when a user turns it on. No user interaction from IT. This enrollment method is most commonly used for devices owned by your organization and establishes the following device statuses:
- Supervised—Supervision prevents users from removing the MDM profile installed by Jamf Pro.
- User-Approved MDM—User-Approved MDM grants Jamf Pro administrators additional device management privileges, such as managing third-party kernel extensions.
Integrating Jamf Pro with Automated Device Enrollment involves the following steps:
-
Download a public key (.pem) file from Jamf Pro.
-
Obtain a server token file (.p7m) from Apple.
-
Upload the server token file to Jamf Pro.
You can repeat this step to create multiple multiple Automated Device Enrollment instances in Jamf Pro.
Jamf Pro automatically syncs and displays Automated Device Enrollment updates from Apple every two minutes.
Note:
-
Up to a two minute syncing delay may occur, which can cause outdated Automated Device Enrollment to display in Jamf Pro. Additional environment-specific factors can affect the syncing between Jamf Pro and Apple.
-
Deleting an Automated Device Enrollment instance removes the integration from Jamf Pro but does not delete the settings in Apple School Manager or Apple Business Manager.
Downloading a Public Key
Before you can obtain the server token file from Apple, you need to download a public key from Jamf Pro.
- In Jamf Pro, click Settings
 in the top-right corner of the page.
 - In the Global section, click Automated Device Enrollment
 .
. - Click Public Key to download the public key.
The public key (.pem) is downloaded.
Obtaining the Server Token File
You must upload a public key (.pem) from Jamf Pro to Apple School Manager or Apple Business Manager to obtain a server token file (.p7m).
You need an Apple School Manager or Apple Business Manager account with the Administrator or Device Manager role assigned.
For more information about Apple School Manager, accounts, and roles, see the following Apple documentation:
Note:
Jamf recommends you only use one Apple School Manager or Apple Business Manageraccount to integrate with Automated Device Enrollment. Using more than one account makes any issues more difficult to troubleshoot..
Uploading the Server Token File to Configure Automated Device Enrollment
Upload a server token file to create an Automated Device Enrollment instance in Jamf Pro.
- In Jamf Pro, click Settings in the top-right corner of the page.
- In the Global section, click Automated Device Enrollment .
- Click New
 .
. - Click Save
 .
.
To configure another instance, repeat this process.
You can now configure Computer PreStage Enrollments or Mobile Device PreStage Enrollments to enroll devices into Jamf Pro via Automated Device Enrollment.
Replacing a Server Token File to Renew an Automated Device Enrollment Instance
If your Automated Device Enrollment server token expires or needs replacing, you must download a new token from Apple School Manager or Apple Business Manager and upload it to Jamf Pro.
Jamf Pro displays an expiration warning in Notifications when the Automated Device Enrollment service token is about to expire.
Note:
If you are uploading a new server token file (.p7m) to renew an expired Automated Device Enrollment instance, Jamf recommends that you do not delete the expired instance from Jamf Probefore uploading the new server token file.
- Log in to Apple School Manager or Apple Business Manager.
- If prompted, follow the onscreen instructions to verify your identity.
- Click on your account name in the lower-left corner, and then choose from the pop-up menu.
- Select your server name listed under Your MDM Servers.
- Click Download Token.
- Choose from the pop-up window and save to your computer.
- In Jamf Pro, click Settings in the top-right corner of the page.
- In the Global section, click Automated Device Enrollment .
- Select the Automated Device Enrollment instance you want to renew and click Edit.
- Click Upload Server Token File to upload the server token file (.p7m) you downloaded from Apple. The information contained in the server token file is displayed.
- Click Save .
Jamf Pro how-to: Volume Purchasing Token Integration and Renewal
Share me
How to
Volume Purchasing Integration
Jamf Pro’s volume purchasing integration syncs with Apple School Manager or Apple Business Manager to automatically populate your apps and books in Jamf Pro for managed distribution to devices or users.
In Apple School Manager or Apple Business Manager, the Apps and Books section provides a central place to purchase content in volume. All purchased content is associated with a location-based service token. A default location is included, but you can create multiple locations to help you manage your content by office location, departments, or budget holder.
In Jamf Pro, each location token is uploaded to establish volume content syncing and make your apps and books are available for managed distribution. You can also view and search app information, such as the amount of used and available licenses for paid apps.
Volume Purchase Location Considerations
Consider the following when adding locations to volume purchasing in Jamf Pro:
-
To avoid issues with content scoping and renewal dates, it is recommended that you do not configure multiple locations for the same distribution content.
-
Each service token for the specific distributed content should only be allocated once. For example, if the service token you want to upload already exists in Apple’s Profile Manager, delete the service token from Apple’s Profile Manager before uploading it to Jamf Pro. This limitation includes a single server instance.
-
If you upload a new token file to renew distributed content licenses, it is recommended that you do not delete the expired location from Jamf Pro before uploading the new server token file.
-
If you configured a location for your distributed content licenses and later integrated your environment with Apple School Manager or Apple Business Manager, it is recommended that you do not add a separate location for these licenses.
Use the button on the location Details tab to upload the new token (.vpptoken) that you acquired from Apple School Manager or Apple Business Manager. This will allow Location to display for your Apple School Manager token in Jamf Pro. When prompted, reclaim the service token to use it with your Jamf Pro instance. For information on how to obtain the token file, see the following Apple documentation:
Note:
It is recommended that you only use one Apple School Manager or Apple Business Manager account to integrate with volume purchasing. Using more than one account makes it difficult to isolate the account causing the issues when troubleshooting.
-
Deleting a location removes the instance from Jamf Pro but does not delete the settings in Apple School Manager or Apple Business Manager.
Adding a Volume Purchasing Location to Jamf Pro
To distribute paid apps and books purchased in volume, you must upload one or more location-based tokens to Jamf Pro.
You also choose the country associated with the location and can specify that all purchased content is populated in the app and eBook catalogs.
- In Jamf Pro, click Settings in the top-right corner of the page.
- In the Global section, click Volume purchasing
 .
. - Click New .
- Click Save .
Adding Volume Purchasing Notifications
To make the managed distribution content management more efficient, you can enable a volume purchasing notification. This allows Jamf Pro to send you a daily email after the predefined condition is triggered. You can also specify the recipients to send the notification to. To properly configure a notification, at least one location must exist in Jamf Pro, and you must be logged in with a Jamf Pro user account that has full access or site access and an email address configured.
To add volume purchasing notifications, you need:
-
An SMTP server set up in Jamf Pro (For more information, see SMTP Server Integration.)
-
At least one location configured in Jamf Pro
-
Email notifications enabled for Jamf Pro user accounts (For more information, see Email Notifications.)
- In Jamf Pro, click Settings in the top-right corner of the page.
- In the Global section, click Volume purchasing .
- Click New .
- Click the Scope tab and configure the scope of the notification by adding recipients:
- Click Add
 to add recipients of the notification. You can select the existing Jamf Pro user accounts, or manually add external recipients that are not registered in Jamf Pro.
 - Click Done in the top-right corner of the pane.
- Click Add
After adding a volume purchasing notification, you must enable it.
Renewing your Volume Purchase Token
- In Jamf Pro, click Settings in the top-right corner of the page.
- In the Global section, click Volume purchasing .
- Select the correct location for which you want to renew the token.
- Click Upload Service Token and upload the service token (.vpptoken)
Jamf Pro how-to: Renewing Apple Push Notification Certificates
Share me
How to
Push Certificates
A push certificate is an encrypted file generated by Apple that establishes trust between a third-party service like Jamf Pro and Apple Push Notification service (APNs). APNs is the medium through which Jamf Pro commands and information are sent to and from devices. Devices continuously listen to APNs for commands and send messages back to Jamf Pro through APNs after commands have been received.
Each push certificate is valid for one year and must be renewed using the same Apple ID that was used to generate it.
If you have a push certificate in .p12 format, you do not need to create a new one. You can simply upload the .p12 file to Jamf Pro following the instructions in this section.
You can also use Jamf Pro to renew your push certificate when needed.
Note:
Uploading a push certificate to Jamf Pro automatically enables the Enable Push Notificationssetting in Jamf Pro’s Security settings.
Creating a Push Certificate
A push certificate is an encrypted file generated by Apple that establishes trust between Jamf Pro and the Apple Push Notification service (APNs) to allow secure communication to devices enrolled in Jamf Pro.
An assistant in Jamf Pro guides you through the following steps to create a new push certificate (.pem) and upload it to Jamf Pro.
-
A valid Jamf ID. To create a Jamf ID, go to: https://id.jamf.com/CommunitiesSelfReg
-
A valid Apple ID. (An institutional Apple ID is recommended.)
- In Jamf Pro, click Settings in the top-right corner of the page.
- In the Global section, click Push certificates
 .
. - Click New .
- Click Upload
 .
. - Click Edit
 .
. - Click Save .
Uploading a Push Certificate (.p12)
If you have a push certificate that’s in .p12 format, you can upload it to Jamf Pro.
Note:
You will only have a push certificate in .p12 format if the CSR used to create the certificate was not issued by Jamf Pro. Uploading a push certificate to Jamf Pro automatically enables the Enable Push Notifications setting in Jamf Pro’s Security settings.
- In Jamf Pro, click Settings in the top-right corner of the page.
- In the Global section, click Push certificates .
- Click New .
- Select Upload push certificate (.p12).
- Follow the onscreen instructions to upload the push certificate.
Renewing the Push Certificate
Important:
Jamf that you do not delete the existing push certificate from Jamf Pro when renewing a push certificate.
-
A valid Jamf ID. To create a Jamf ID, go to: https://id.jamf.com/CommunitiesSelfReg
-
A valid Apple ID. (An institutional Apple ID is recommended.)
Note:
If you are renewing a push certificate that was originally obtained from Apple’s iOS Developer Program (iDEP), you must use the Apple ID for the iDEP Agent account used to obtain the certificate.
- In Jamf Pro, click Settings in the top-right corner of the page.
- In the Global section, click Push certificates .
- Click the push certificate, and then click Renew
 .
.
Deleting the Push Certificate
Deleting the push certificate from Jamf Pro disables communication between Jamf Pro and APNs. This prevents Jamf Pro from sending macOS configuration profiles and macOS remote commands to computers, and managing iOS devices. In addition, without a push certificate, Mac App Store apps cannot be distributed to computers. To restore these capabilities, you must create a new push certificate, and then re-enroll your computers and mobile devices with Jamf Pro.
- In Jamf Pro, click Settings in the top-right corner of the page.
- In the Global section, click Push certificates .
- Click the push certificate and click Delete
 . Then click Delete again to confirm.

Jamf Connect how-to: Managing license files
Share me
How to
Jamf Connect license files are easy to update and distribute to your fleet of Macs with Jamf Pro. In this video, we show the simple process of creating a Configuration Profile that only contains the LicenseFile key for Jamf Connect.
When renewal time comes around, simply copy the new license file from account.jamf.com and paste into Jamf Pro, update the config profile and distribute to all machines.
Step by Step Instructions:
- Navigate to Computers → Configuration Profiles.
- If this is the first time you’re distributing a Jamf Connect license to your fleet, create a new Configuration Profile with the “+ New” button in the upper right corner of the screen.
- If you’re updating an existing profile, select and edit it.
- In the General tab, name your profile something that you’ll remember and your fellow administrators will understand. Categories help sort config profiles in Jamf Pro to make it easier to find when updating later.
- Scroll down on the left-hand toolbar to the Applications and Custom Settings payload. Select the option for “JamfApplications”. You’ll be adding two configurations to one profile: com.jamf.connect and com.jamf.connect.login.
- Select whatever is the latest version of the profile. LicenseFile is a common key that has existed since the beginning, so it will still work if you’re distributing an older copy of Jamf Connect. Select the JamfConnect.json schema built-in to Jamf Pro.
- Use the Add/Remove Properties option to remove all the keys EXCEPT the LicenseFile.
- Repeat this process to get the configuration for Jamf Connect Login and Jamf Connect menu bar. Keep this tab open.
- Open a new tab in your web browser and navigate to account.jamf.com. Log in with your Jamf Nation credentials and select the Jamf Connect info from the Products tab.
- In the section for License, you have an option to copy the license info to the clipboard. Select this to copy the license to your clipboard.
- Return to the tab with Jamf Pro and paste the license file key into both the config for Jamf Connect Login and Jamf Connect menu bar.
- Save the configuration profile and select the “Scope” tab to target machines in your fleet which use Jamf Connect.
Special notes:
If you are renewing your license, check for any other configuration profile that applies to Jamf Connect. Only one LicenseFile key can be applied at a time. Misconfiguration may produce unexpected results in the Jamf Connect application if there are multiple LicenseFiles applied at the same time.